Fire Golem Necromancer PD2 Build
Fire Golem Necromancer is an S-tier PD2 build with top-tier clear speed, powerful minions, and excellent endgame farming potentialFire Golem Summoner Necromancer Build
Last Update: April 17, 2026
Introduction
Fire Golem Necromancer is currently one of the strongest and most efficient farming builds in Project Diablo 2, especially when it comes to fast-paced map clearing. It excels as a high-end farmer, offering insane clear speed, great mobility, and near-immortality once properly min-maxed. Unlike more passive summoner setups, this build plays aggressively and dynamically, turning you into a true “loot generator” that rapidly teleports from pack to pack, instantly wiping entire screens with empowered Fire Golems.
The core gameplay revolves around summoning and maintaining your Fire Golems while using teleport (via Blood Warp) to reposition constantly. Your minions do all the damage, melting enemies almost instantly, while you focus on movement and maintaining buffs like Bone Armor. This results in an extremely fluid and satisfying playstyle, where downtime is minimal and efficiency is maximized. It’s one of the fastest builds for map farming currently available.
Despite its summoner nature, the build is not passive — it rewards fast decision-making and efficient teleporting. With proper gear, your survivability becomes exceptional thanks to mana-based defenses and Bone Armor, allowing you to dive into dense packs without hesitation. This makes it ideal for experienced players looking to maximize farming speed and currency generation.
Recommended Breakpoints (Quick Overview)
To ensure smooth gameplay, especially with constant teleporting and buff upkeep, aim for the following breakpoints:
- Faster Cast Rate (FCR): 48% (minimum) → 75% (optional, but not mandatory)
- Faster Hit Recovery (FHR): 56% (important for smooth repositioning between packs)
FCR improves the responsiveness of your Blood Warp and Bone Armor casts, but the build does not heavily rely on high FCR. FHR, however, is quite important to avoid getting locked when jumping into dense monster packs.
Stat Allocation (Baseline Setup)
- Strength: ~155 (for Monarch or other gear requirements)
- Dexterity: Base (no investment needed)
- Vitality: Minimal or none
- Energy: Dump the rest of your points here
This setup may seem unusual, but it synergizes perfectly with the build’s mechanics. Your primary defenses come from high mana, Bone Armor, and positioning rather than raw Life. Additionally, keeping Vitality low helps manage the Life cost of Blood Warp, making teleporting much more sustainable.
Pros
- One of the smoothest Map farming builds out there
- Tons of damage applied instantly after you teleport
- Near-immortal status when min-maxed
- Insane scaling with gear
- Low reliance on aim and precision
Cons
- Quite expensive
- Week early and gear-dependent
You can also visit this page to check our other Project Diablo 2 Builds
Skill Trees
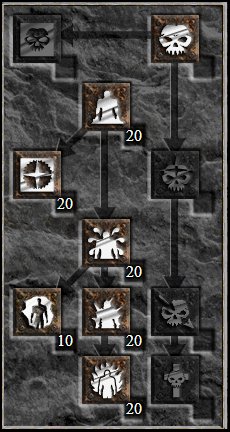
The core of this build revolves around the Summoning tree, which contains all the scaling for your Fire Golems and defines your entire playstyle. Unlike many other Necromancer setups, this build is fully committed to a single minion type, maximizing its damage through synergies and +skills.
In the Summoning tree, you max Fire Golem as your primary damage source, along with Golem Mastery to increase their stats and unlock up to 5 active Golems as soon as possible. You then invest heavily into all other Golem types, as they act as synergy skills, significantly boosting your Fire Golems’ damage. This is where all your power comes from, and every additional point directly improves your clear speed.
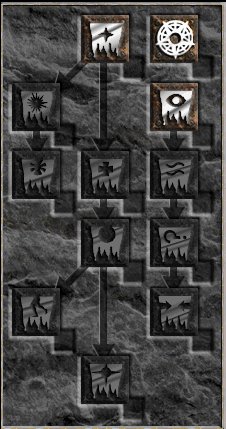
For mobility, you use Blood Warp, but unlike most builds, you do not max it. Instead, you aim for around ~0.7s cooldown after gear and +skills. This allows your teleport timing to align with your Golems’ damage ticks, so when you jump into a new pack, enemies die almost instantly. Overinvesting here is unnecessary and can actually disrupt the build’s flow.
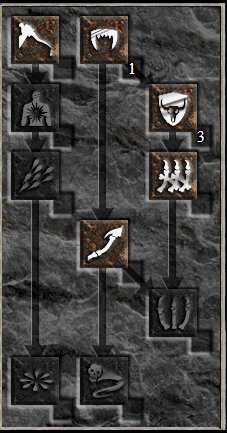
The Poison and Bone tree is only used for Bone Armor, where you typically allocate just 1–3 points. With +skills, this provides a strong defensive layer, while the rest of your survivability comes from high mana and constant repositioning.
Curses are not required for this build, as it is focused purely on speed and efficiency. Optionally, you can take a single point in Lower Resist for additional damage, but it is not part of the standard setup and is usually skipped to maintain a smoother gameplay loop.
Gear
The Fire Golem Necromancer has a very specific gearing path in Project Diablo 2, focused on +Skills, mana scaling, and sustain, but it can be approached in two stages — a core, accessible setup and a fully min-maxed version.
In the early and mid game, you should aim for a strong but relatively easy-to-acquire setup built around classic caster items. Core pieces include Harlequin Crest, Arachnid Mesh, Marrowwalk, and Skin of the Vipermagi, combined with Stone of Jordan rings for +Skills and mana. For gloves, you can use Magefist or Gravepalm depending on your preference and availability.
In this version, you can comfortably play using a Dominion Wand and a Phoenix Runeword shield, which already provides Redemption Aura for sustain. This setup is more than enough to farm efficiently, and you can also invest a bit more into Vitality here if needed, as it is more forgiving and less optimized around pure mana stacking.
As you transition into the min-maxed version, the build shifts into a much more specialized setup. The core revolves around Phoenix Runeword weapon, Epiphany Runeword shield, and Rain Runeword armor. This combination enables full reliance on mana through Mana Shield, greatly increasing your survivability and allowing you to teleport aggressively without risk. At this stage, your defenses come almost entirely from your mana pool, regeneration, and Bone Armor uptime.
Separately, an important part of this build is prebuff gear. Since Golems snapshot their damage when summoned, you can temporarily equip items with +% Fire Skill Damage and +Golem Levels (such as Ormus’ Robes, Facet Diadems, or specialized wands and off-hands), summon your Golems, and then switch back to your main gear. This significantly boosts your damage, especially in high-tier maps like T3, where every bit of optimization matters.
Overall, the build scales from a strong and accessible caster setup into a highly optimized, mana-based powerhouse. With the right gear and proper prebuffing, it becomes one of the most efficient and durable farming builds available.
Charms
For Charms, the setup is very straightforward and focused on maximizing your Golems while covering defensive gaps in Project Diablo 2.
You should prioritize Hellfire Torch and Annihilus as your core unique Charms, providing +Skills, Attributes, and Resistances.
For the rest of your inventory, use Grand Charms with +Summoning Skills, as they directly scale your Fire Golems’ damage and are your biggest power boost.
Small Charms should be used to fill in missing Resistances and help you reach the 56% Faster Hit Recovery (FHR) breakpoint, ensuring smooth teleporting between packs without getting hit-locked.
Overall, your Charm setup is all about +Skills first, then covering utility and defensive stats to maintain a fluid and safe gameplay loop.
Mercenary
For the Fire Golem Necromancer in Project Diablo 2, the Mercenary choice is very straightforward — there is essentially one optimal option that fully complements the build.
You should use an Act 2 Mercenary, primarily because he can wield Infinity Runeword, which provides the powerful Conviction Aura. This aura significantly reduces enemy resistances, massively boosting your Fire Golems’ damage and overall clear speed. It’s a core part of the build’s scaling and one of the biggest damage multipliers available.
Outside of that, you simply equip your Mercenary with standard defensive and utility gear to keep him alive:
- Andariel's Visage – Attack Speed and Life Leech
- Shaftstop – Damage Reduction
- String of Ears – Additional sustain and mitigation
- Gore Rider – Extra offensive utility
There are also some niche optimization options. For example, using Flickering Flame Runeword on your Mercenary can grant a temporary fire-related buff. When active, you can take advantage of it during your prebuff phase to summon slightly stronger Golems. Similarly, gloves like Lava Gout can provide minor additional utility.
Overall, the Mercenary setup is simple but extremely impactful — Infinity alone defines the choice, while the rest of the gear is focused on keeping your Merc alive and maintaining consistent aura uptime.
Final Thoughts
Fire Golem Necromancer is one of the most efficient and explosive farming builds in Project Diablo 2, capable of clearing maps at an incredible pace while remaining extremely safe when fully optimized. Its teleport-based, minion-driven playstyle turns it into a true “loot machine,” perfect for players who want to maximize efficiency and generate consistent profit.
We will continue updating this guide alongside future Project Diablo 2 Seasons and expand our PD2 content with more builds and strategies.
If you have suggestions or would like to see other builds covered, feel free to share your feedback — it helps us improve and deliver better guides.
Images used in this article are the intellectual property of Blizzard Entertainment or its corresponding owners.