
Skeleton Summoner Necromancer Build Guide for PD2
A very strong Setup for the most iconic Summoner Necromancer that uses all Skeletal Minions to create huge army!Skeleton Summoner Necromancer Build
Last Update: May 9, 2026
Introduction
The Skeleton Summoner is an ideal choice for players who value quantity over quality. You will summon a huge army of Skeletal Mages, Skeletal Warriors, and Skeletal Archers. You can also Revive fallen monsters to fight for you temporarily, but that is highly optional. The Council Members fought in the Travincal area are easily the strongest Minions you can get in the game, but you have to Revive them every time you start a new hunting season. For this reason, we recommend focusing on your permanent Minions instead.
Your army deals a mix of Physical and all types of Elemental Damage, so you don't ever have to worry about monsters' immunities. That said, most of your Damage is of the Physical type, which is why you will want to improve it even more with Curses and Auras. Thankfully, the Amplify Damage is the very first Skill in the Curse Tree, so you don't have to spend too many points there. If you want to maximise the Damage of your Revives, you will have to pick the Lower Resist Curse instead. On that note, Skeletal Mages are affected by Attack Speed instead of Cast Rate, so Fanatism Aura will affect all your Minions.
The Desecrate creates Corpses, which allows you to summon your Skeletons on the spot. If you don't mind some traveling, you can save 3 Skill Points and source your Corpses from organic monsters killed by your Mercenary. You will also have one Golem at your disposal, depending on your preferences: Clay Golem to slow down Enemies, Blood Golem for better Life sustain, or Iron Golem to grant you even more useful Auras from sacrificed Items. You can also spend some extra points on Golem Mastery to summon more Golems for greater utility.
This Build is very safe from the sheer amount of summons that surround and tank enemies for you. You will also have very potent Bone Armor that absorbs a large amount of damage and enhances your Defense drastically. Thanks to this approach, you can be more lenient on your Elemental Resistances, since they do not affect the damage absorbed by the Bone Armor anyway.
Recommended Breakpoints
Your summons do the majority of the work for you, but you still need decent FCR for mobility and utility Skills. You can improve their Attack Speed only through the Fanaticism Aura; item bonuses do not affect your Minions in any way.
- Faster Cast Rate (FCR): 30%
- Faster Hit Recovery (FHR): 39%
- Minion Attack Speed: 23% (Fanaticism Level 4-10) → 31% (Fanaticism Level 11+)
You will rarely get Hit in the first place, and the Bone Armour absorbs most of the incoming Damage. As a result, you don't need to focus too much on Breakpoints.
Stat Allocation
- Strength: Enough to meet gear attribute requirements
- Dexterity: Enough to meet gear attribute requirements
- Vitality: Nothing
- Energy: Invest all remaining points
Each point of Energy grants 3 Damage absorption for the Bone Armour, while 1 point of Vitality grants only 2 Life. It also improves your Mana Regeneration.
Pros
- Very easy to play
- Huge army of summons
- Great Damage
- Durable
Cons
- Not very engaging playstyle
- Minion AI is not great
You can also visit this page to check our other Project Diablo 2 Builds
Skill Trees
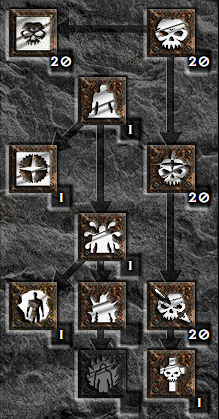
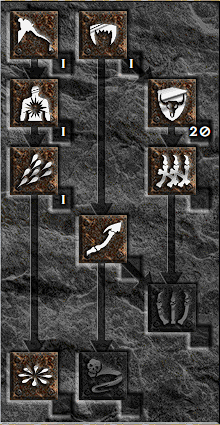
You will obviously want to spend all 20 Points for each of your main Summon and their Skeleton Mastery. Unlock the Bloodwarp for mobility, and Golems for utility. The points spent on the Revives are flexible, depending on your preferences.
You can spend just one point on the Bone Armor to get the absorption. Each additional Point grants you 10% more total Defense, which quickly adds up for a massive boost to your survival. The Desecrate is an optional choice to ease resummoning your army.
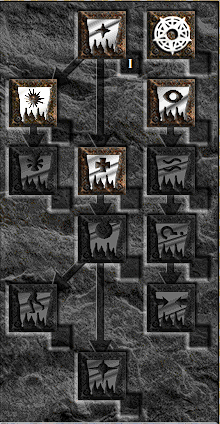
You only need 1 point to unlock the Amplify Damage Curse, although you can spend more Points to slightly improve your Damage at the cost of survivability. If you want to focus on Council Revives, you would need the Lower Resistance curse instead.
Gear
There is only one way to improve your Damage: through additional Skill Levels, since your Minions do not inherit your Attack Speed or Resistance Pierce. You can still make use of Curses or Auras, but this role is fulfilled better by your Mercenary.
The best Weapon to wield is the Arm of King Leoric, which allows you to summon 2 extra Warriors or Archers, and raises their levels. There are multiple good Shields to use: Homunculus, Boneflame, Darkforce Spawn, Sacred Totem, or Martyrdom, all of which grant 2 or 3 Skill levels, so the choice depends on your remaining gear.
Reiamining gear choices are quite limited. The Trang-Oul's Scales is very good armor, but it is the only piece of this Set you will want to wear. The Gravepalm are the only Gloves that grants you any damage. On the Helmet, you will want anything with +2 Skill levels, such as Nightwing's Veil, Andariel's Visage, Steel Shade, but the best choice is the Harlequin Crest due to the large Magic Find bonus. The Marrowwalk is a popular choice for all builds due to the Freeze immunity, but here they also provide Skeleton Mastery levels.
The Jewellery is very typical as well. The Arachnid Mesh, Mara’s Kaleidoscope, and any of the Rings that grant Skill levels are the golden standard. The Wisp Projector is especially useful, as the Heart of Wolverine improves the damage and Attack Rating of your Minions. At a very high budget, you should also consider a Magic Amulet with Corruption or Sanctification to gain 4 Skill Levels.
Charms
Use Grand Charms that improve your Summoning Skills. Ideally, they should be paired with Life or FHR. Use Small Charms to fill the Resistance Gaps and improve the Life even more. A bit of Magic Find is also a good option.
You will also want the obvious Unique combo: Gheed's Fortune, Hellfire Torch, and Annihilus. All of them are very valuable and should be included in every Build.
Mercenary
The Mercenary choice is very broad. You will need the Fanaticism Aura, which can be obtained through the Beast or Faith Runewords. The Faith is slightly better, as it enables the final Attack Speed Breakpoint of your Minions. The Might Aura is also very useful, and can be sourced from Templar's Might Armour or Act 5 Mercenary, although there you can also get Battle Orders and Battle Cry, which greatly reduce the Physical Resistance of affected monsters. Our recommendation is Act 1 Vigor Aura, as Movement Speed is the most valuable stat for your Minions due to their AI.
- Vampire Gaze or Andariel's Visage or Ferocity (Helmet)
- String of Ears or Nosferatu’s Coil (belt)
- Templar's Might (Armour)
- Lava Gout's or Dracul Grasp (gloves)
- Rare Boots with Life, Movement Speed, and Resistance
Final Thoughts
The Skeleton Necromancer is the most iconic Summoner Build in the game, and for good reasons. It is strong, save, and very enjoyable to play. It will easily carry you through the early progression and greatly scales into the endgame!
We will continue updating this guide with future Project Diablo 2 changes and expand our PD2 content with more builds and strategies.
If you have suggestions or would like to see other builds covered, feel free to share your feedback—it helps us improve and deliver better guides.
Images used in this article are the intellectual property of Blizzard Entertainment or its corresponding owners.