 Buy/Sell
 Log in


Blessed Hammer Paladin Build for Diablo 2 Resurrected
Blessed Hammer Paladin remains a top-tier Diablo II Resurrected build, combining devastating Hammers with unmatched versatility.Blessed Hammer Paladin Build
Last Update: July 16, 2026
Introduction
Blessed Hammer Paladin is one of the most iconic and powerful caster builds in Diablo II Resurrected, combining devastating Magic Damage with one of the strongest defensive kits available to any character. By constantly creating spinning waves of Blessed Hammers supported by Concentration, the build is capable of destroying entire monster packs while remaining exceptionally durable thanks to Holy Shield, high Block Chance, and Paladin's defensive auras. Unlike many elemental casters, Hammerdin rarely struggles with immunities, allowing it to farm almost every area in the game with minimal restrictions.
As the build progresses into the endgame, Blessed Hammer Paladin becomes one of the most reliable farming characters in Diablo II Resurrected. Enigma completely transforms the gameplay by providing Teleport and allowing precise positioning of Hammer fields, while powerful items such as Heart of the Oak, Spirit, and Arachnid Mesh push the build toward its maximum potential. With incredible survivability, outstanding clear speed, and one of the smoothest scaling curves in the game, Hammerdin remains one of the strongest Ladder Starter choices and a timeless favorite for Season 14.
Recommended Breakpoints
- Faster Hit Recovery (FHR): 86% (recommended)
- Faster Cast Rate (FCR): 125% (ideal endgame)
Stat Allocation
- Strength: Enough to meet gear attribute requirements
- Dexterity: Enough to maintain desired Block Chance with Holy Shield (usually 75% for Max Block setups)
- Vitality: Invest all
- Energy: Nothing
Vitality should receive most available points, as Hammerdin benefits greatly from a large Life pool while staying relatively safe behind high Defense, Block Chance, and defensive Paladin mechanics. Mana issues are easily managed through items such as Spirit, Insight on the Mercenary during progression, and Redemption, making investment into Energy unnecessary.
Pros
- Exceptional Area Clear
- Very Strong Magic Damage
- Outstanding Defensive Toolkit
- Excellent Ladder Starter
Cons
- Requires Precise Positioning
- High FCR Investment for Maximum Performance
You can also visit this page to check our other Diablo 2 Resurrected Builds
Skill Trees
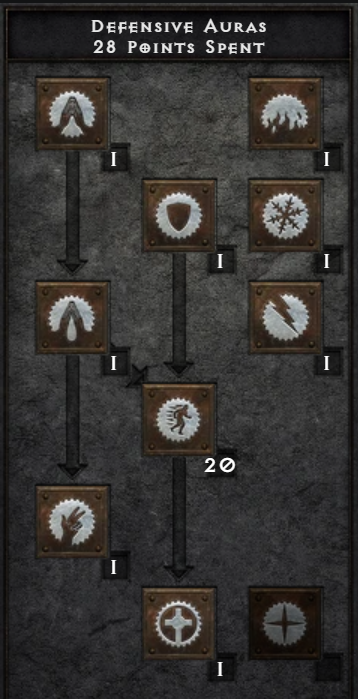
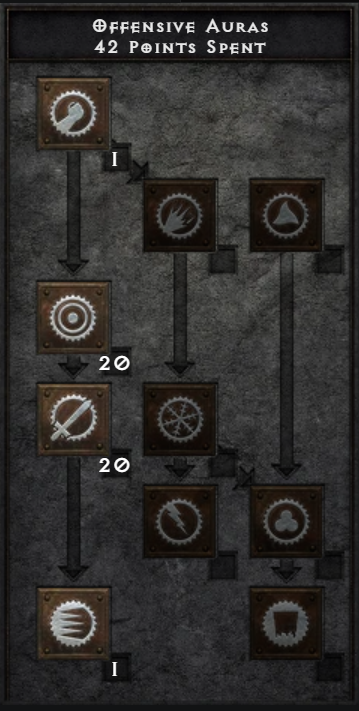
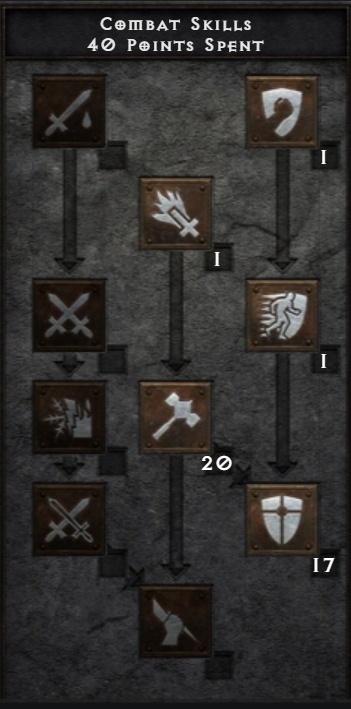
The recommended leveling path for the Blessed Hammer Paladin begins with a Holy Fire setup, which provides exceptional early-game damage and allows smooth progression through Normal difficulty with minimal gear investment. Holy Fire combined with skills such as Zeal offers fast clearing while you collect the items needed for the final caster setup. Around the later stages of Normal and into Nightmare, you can transition into a Hammerdin playstyle by respecing into Blessed Hammer and its core synergies.
Once Blessed Hammer, Blessed Aim, Vigor, and Concentration are developed, the build fully transforms into its iconic endgame version. Concentration dramatically increases Hammer damage, while Holy Shield provides exceptional defense and survivability through increased Block Chance and Defense. Utility skills such as Redemption improve sustain between fights, and later Enigma completely changes the gameplay by allowing precise positioning and rapid movement. With its strong scaling and straightforward progression, the transition into the finished Hammerdin setup is one of the smoothest caster upgrades available in Diablo II Resurrected.
Gear
Void has become one of the strongest weapon choices for the Blessed Hammer Paladin, offering an exceptional combination of +2 to All Skills, 40% Faster Cast Rate, increased Magic Skill Damage, additional Attributes, and Magic Find. Since Blessed Hammer deals Magic Damage, the bonus Magic Skill Damage directly improves the build's offensive potential, making Void one of the best options for players looking to maximize Hammer damage in optimized endgame setups. Heart of the Oak remains an excellent all-around alternative, providing +3 to All Skills, 40% Faster Cast Rate, valuable Resistances, and additional Mana, making it especially attractive for players who value consistency and survivability. Spirit in a Paladin shield is also a fantastic budget-friendly option, offering massive +Skills, Faster Cast Rate, Faster Hit Recovery, and Resistances at a much lower cost.
Herald of Zakarum remains one of the strongest shield choices for the Blessed Hammer Paladin, especially in high-damage setups targeting the 75% Faster Cast Rate breakpoint. It provides +2 to Paladin Skills, +2 to Combat Skills, excellent Resistances, increased Blocking, and strong defensive bonuses, making it an exceptional choice for players who prioritize maximum Hammer damage and survivability. Spirit in a Paladin shield is the preferred option for higher Faster Cast Rate setups, offering +2 Skills, up to 35% Faster Cast Rate, Faster Hit Recovery, Mana, Vitality, and additional Resistances. While Spirit provides smoother casting and faster Teleporting, Herald of Zakarum remains a competitive endgame choice for players who prefer a more traditional and durable Hammerdin setup.
Helmet choices depend largely on whether you want maximum damage, balanced farming efficiency, or additional survivability. Harlequin Crest remains one of the most reliable options thanks to +2 Skills, Life, Mana, Damage Reduction, and Magic Find, making it effective in almost every situation. Hellwarden's Will is a powerful offensive alternative for players looking to maximize Blessed Hammer damage, while a Rare Paladin Circlet with +2 Paladin Skills, Faster Cast Rate, Life, Resistances, or Magic Find can become the strongest choice in highly optimized setups. During early progression, Lore remains one of the best low-cost sources of additional Skills.
Enigma is the defining armor choice for Hammerdin, completely changing the way the build plays by providing Teleport, +2 Skills, Strength, and Magic Find. Precise positioning is extremely important for Blessed Hammer, and instant repositioning allows you to place yourself directly inside enemy packs while keeping maximum damage uptime. Before obtaining Enigma, Skin of the Vipermagi remains one of the strongest progression armors thanks to its Skills, Faster Cast Rate, and Resistances, while Chains of Honor offers a more defensive alternative with excellent survivability.
Glove selection is relatively simple, with Magefist being the preferred option for most setups. The 20% Faster Cast Rate and Mana regeneration help reach important casting breakpoints while improving overall gameplay comfort. Trang-Oul's Claws provide the same Faster Cast Rate together with additional Cold Resistance, making them a solid alternative when balancing defensive stats. For Magic Find-focused setups, Chance Guards can also be considered when enough Faster Cast Rate is already provided by the rest of the gear.
Boot selection depends mainly on whether you prioritize survivability, Magic Find, or general quality of life. Sandstorm Trek is one of the strongest defensive options, providing Faster Hit Recovery, Strength, Vitality, and Poison Resistance, while War Traveler is preferred by players focused on maximizing Magic Find. Other options such as Rare Boots with Faster Run/Walk, Resistances, Life, and Faster Hit Recovery can also be valuable for highly optimized setups where specific defensive requirements need to be met.
Belt selection is heavily influenced by the 125% Faster Cast Rate goal. Arachnid Mesh is the strongest overall option, providing +1 Skill Level, 20% Faster Cast Rate, and additional Mana, making it almost impossible to replace in endgame setups. For players still progressing, a crafted Caster Belt or Rare Belt with Faster Cast Rate, Life, Mana, and Resistances can help reach important breakpoints before obtaining premium gear. Verdungo's Hearty Cord is another defensive option for players who prefer additional Life and Damage Reduction over maximum casting speed.
Jewelry choices focus primarily on increasing Skill Levels while helping complete Faster Cast Rate requirements. Mara's Kaleidoscope remains one of the most balanced amulets, providing +2 Skills, Resistances, and Attributes, while a Rare or Crafted Caster Amulet with +2 Paladin Skills and Faster Cast Rate can become superior in highly optimized setups. The Stone of Jordan remains a strong offensive ring thanks to its additional Skill Level and large Mana bonus, while Bul-Kathos' Wedding Band provides extra Life. A Rare Ring with 10% Faster Cast Rate, Life, Mana, Strength, or Resistances is often used when additional casting speed is required to reach the final breakpoint. For Magic Find setups, Nagelring remains a popular alternative.
Charms
Charms for the Blessed Hammer Paladin are primarily focused on increasing Skill Levels, improving survivability, and reaching important casting breakpoints for smoother gameplay.
The Paladin Hellfire Torch and Annihilus are essential in every endgame setup, providing valuable Skill Levels, Attributes, and Resistances. Beyond those, Combat Skill Grand Charms are the preferred choice for maximizing Blessed Hammer damage, with Life or Faster Hit Recovery being the most desirable secondary modifiers. Fill the remaining inventory with Small Charms offering Life, All Resistances, Faster Hit Recovery, or Mana depending on your preferred playstyle. Since Hammerdin deals Magic Damage, no Sunder Charm is required, allowing more inventory space for defensive or quality-of-life bonuses such as additional Life, Mana, or Magic Find.
+40% Faster Cast Rate
+20% Faster Hit Recovery
+25% Increased Maximum Mana
+15% Faster Run/Walk
Magic Skill Damage +15%
All Resistances +20
+10 To Dexterity
+10 To Vitality
20% Better Chance of Getting Magic Items
Level 1 Decrepify (30 Charges)
+40% Faster Cast Rate
+75% Damage To Demons
+100 To Attack Rating Against Demons
Adds 3-14 Cold Damage
+10 To Dexterity
All Resistances +30-40
Increase Maximum Mana 15%
Level 4 Oak Sage (25 Charges)
Level 14 Raven (60 Charges)
Required Level: 42
+2 To Combat Skills (Paladin Only)
30% Faster Block Rate
30% Increased Chance of Blocking
+20 To Strength
+20 To Vitality
All Resistances +50
+2 To Light Radius
+20% Bonus To Attack Rating
+25-35% Faster Cast Rate
+55% Faster Hit Recovery
+22 To Vitality
+89-112 To Mana
Cold Resist +35%
Lightning Resist +35%
Poison Resist +35%
+3-8 Magic Absorb
Attacker Takes Damage of 14
+2 To Combat Skills (Paladin Only)
30% Faster Block Rate
+20-45% All Resistances
+Life
+Mana
+Faster Hit Recovery
+30% Faster Block Rate
+20-45% All Resistances
+Life
Required Level: 62
+2 To All Attributes
+1.5 Life Per Character Level
+1.5 Mana Per Character Level
Damage Reduced By 10%
50% Better Chance of Getting Magic Items
20% Faster Cast Rate
+Life
+Mana
All Resistances +#
+Strength
+Dexterity
30% Faster Run/Walk
+10 To Energy
Lightning Resist +30%
Damage Reduced By 7
+2 Mana After Each Kill
+45% Faster Run/Walk
Level 1 Teleport
+750-775 Defense
+0-74 To Strength (Based On Character Level)
Increase Maximum Life 5%
Damage Reduced By 8%
+14 Life After Each Kill
15% Damage Taken Goes To Mana
+1% Better Chance of Getting Magic Items Per Character Level
+200% Damage To Demons
+100% Damage To Undead
8% Life Stolen Per Hit
+70% Enhanced Defense
+20 To Strength
Replenish Life +7
All Resistances +65
Damage Reduced By 8%
25% Better Chance of Getting Magic Items
Required Level: 29
+30% Faster Cast Rate
Magic Damage Reduced By 9-13
All Resistances +20-35
+120% Enhanced Defense
Required Level: 23
+10 Defense
+1 To Fire Skills
+20% Faster Cast Rate
Regenerate Mana 25%
Adds 1-6 Fire Damage
Required Level: 45
Cold Resist +30%
+30 Defense
+25% Poison Skill Damage
+Life
+Mana
All Resistances +#
+Strength
+Dexterity
Magic Find
Required Level: 42
+10 To Vitality
+10 To Strength
Adds 15-25 Damage
40% Slower Stamina Drain
Attacker Takes Damage Of 5-10
30-50% Better Chance of Getting Magic Items
Required Level: 64
+20% Faster Run/Walk
+20% Faster Hit Recovery
+1 Maximum Stamina Per Character Level
+10-15 To Strength
+10-15 To Vitality
50% Slower Stamina Drain
Poison Resist +40-70%
Repairs 1 Durability In 20 Seconds
Required Level: 36
+30% Faster Run/Walk
+10% Maximum Mana
+5 Mana After Each Kill
+200% Enhanced Defense vs. Missile
Required Level: 80
+20% Faster Cast Rate
Slows Target By 10%
Increase Maximum Mana 5%
Level 3 Venom (11 Charges)
Required Level: 63
+10% Faster Hit Recovery
+30-40 To Vitality
Replenish Life +10-13
+100-120 Maximum Stamina
Damage Reduced By 10-15%
Required Level: 27
+10% Increased Attack Speed
+30 Defense
50-80% Extra Gold From Monsters
30% Better Chance of Getting Magic Items
+Life
+Mana
All Resistances +#
+Strength
+Dexterity
Magic Find
All Resistances +20-30
+5 To All Attributes
10-20% Faster Cast Rate
+Life
+Mana
All Resistances +#
+Strength
+Dexterity
+Life
+Mana
Increase Maximum Mana 25%
Adds 1-12 Lightning Damage
+20 To Mana
+0-49 To Life (Based On Character Level)
3-5% Life Stolen Per Hit
+50 Maximum Stamina
Adds 15-45 Cold Damage
+15-20 To Dexterity
+40 Mana
Cold Absorb 20%
Cannot Be Frozen
+Life
+Mana
+Strength
+Dexterity
All Resistances +#
Magic Find
Magic Damage Reduced By 3
Attacker Takes Damage of 3
15-30% Better Chance of Getting Magic Items
Mercenary
The recommended endgame setup is Act 2 Defensive (Holy Freeze) Desert Guard Mercenary
- Insight (Weapon)
- Andariel’s Visage or Guillaume's Face (Helmet)
- Fortitude, Chains of Honor, or Treachery (Armour)
Final Thoughts
Blessed Hammer Paladin remains one of the most iconic and powerful caster builds in Diablo II Resurrected, combining enormous Magic Damage with one of the safest playstyles available. By surrounding yourself with Concentration Aura, Blessed Hammer becomes an extremely efficient clearing tool capable of destroying large monster packs while ignoring many common resistances that slow down other elemental builds.
With access to powerful defensive tools such as Holy Shield, high Block Chance, and multiple Paladin auras, Hammerdin offers an excellent balance between damage and survivability. Although the build requires precise positioning to maximize Hammer coverage and can feel slower before acquiring key gear, it scales exceptionally well into the endgame.
We will continue updating this guide with future Diablo 2 Resurrected changes and expand our D2R content with more builds and strategies.
If you have suggestions or would like to see other builds covered, feel free to share your feedback - it helps us improve and deliver better guides.
Images used in this article are the intellectual property of Blizzard Entertainment or its corresponding owners.