Chain Lightning Sorceress PD2 Build
The most popular Build for the Sorceress that specialises in devastating large hordes of enemies insanely quickly with the Chain LightningChain Lightning Sorceress Build
Last Update: April 26, 2026
Introduction
The Chain Lightning Sorceress is easily one of the most popular Builds in the entire game, and for good reasons! It offers extreme levels of Clear Speed and very satisfying gameplay thanks to the Chaining Lightnings. The Damage against Bosses is not that great, at least not without massive investments. You won't have problems beating the Campaign Bosses or finishing a Map Boss, but taking down a Diablo Clone on higher difficulty levels might prove to be a very hard challenge. The recent Buffs in Season 13 elevated one of the most frustrating downsides of this Skill, which was the insanely low Minimum Damage roll. It is now still low, but not as noticeable during Clearing as it used to.
Your main skill is, of course, the Chain Lightning. To improve its damage, you will mainly look for additional Skill levels and Resistance Pierce. Stacking lots of Faster Cast Rate is also important, as by default this Skill is quite slow to use, but keep in mind this way of improving your Damage also requires solid Mana sustain. It is also worth putting down Static Field at least once during your fights with dangerous Bosses. It lowers enemy Lightning Resistance and their total Life by a significant amount. You can obtain this Skill from various Items, but in the last resort, you can simply pick it up on your Skill Tree for 1 Point.
The Mana and its sustain are important aspects of this Setup, as you will use Energy Shield as your defensive tool. With this approach, you will redirect most of the Damage to be taken from Mana instead of Life. Redirected Damage is not affected by your Resistances, so you can skip them on your gear completely and get more Damage instead.
Recommended Breakpoints
The Chain Lightning is a slow Skill that uses a different limit for the FCR compared to your other abilities.
- Faster Cast Rate (FCR): 78% (low budget) → 117% (high investments)
- Faster Hit Recovery (FHR): 42% (good enough for most content)
Getting a higher FCR is a great way to improve your Damage and overall smoothness of your gameplay, but keep in mind it also increases your Mana Costs per second. Each cast of the Chain Lightning costs quite a lot of it.
Stat Allocation
- Strength: Enough to meet gear attribute requirements
- Dexterity: Enough to meet gear attribute requirements
- Vitality: Base (Dump in early progression)
- Energy: Put everything else here once you switch to Energy Shield style
It is more beneficial to use Energy as your main defensive layer. During the early progression, the Vitality will be more important, as you won't have access to the high-level Energy Shield Skill yet.
Pros
- One of the highest Clear Speeds in the game
- Satisfying chaining visuals
- Versatile farmer
- Multiple gearing options
Cons
- Very popular, which affects the prices of your Items
- Minimum Damage is still very low
You can also visit this page to check our other Project Diablo 2 Builds
Skill Trees
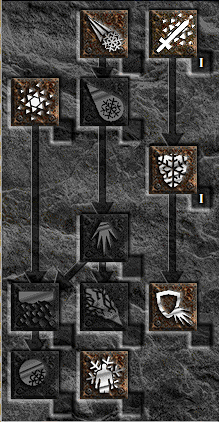
Your main Tree is obviously the Lightning Tree. Here you will find your main Skill, Chain Lightning, and its synergies that boost your Damage: the Lightning and Charged Bolt. The Lightning Mastery grants even more Damage per point, so max it out first.
You will also get the majority of survivability here in the form of Energy Shield. It gets massively boosted by every hard point spent on this Skill - it improves the amount of Damage redirected, and lowers the amount of Mana you drain. Teleport is a massive boost to your mobility. It applies a 1-second debuff on you that lowers your Damage significantly, so you will want to put any remaining points here to improve your Clear Speed. The Static Field should ideally be obtained from other sources, but if you don't have access to them yet, allocate it on the Skill Tree instead.
The Warmth in the Fire Tree is picked for a massive boost to your Mana Regeneration, which is always useful to have. You won't need any other Skill here.
Lastly, you can spend 2 points on the Shiver Armour to improve your Defense significantly. You will rarely get hit, so you can skip it and invest in more Damage instead.
Gear
You will have only one goal: to get as many additional Skill Levels for your Chain Lightning as possible, while also reaching comfortable levels of Faster Cast Rate. Piercing Enemy Resistance is also very important for your Damage. Thanks to the Energy Shield, it is much easier to reach those goals, as you don't need to worry too much about Resistance on your Gear. Poison Resistance is still useful, although it can be mitigated by carrying some Antidotes on you.
In season 13, several 2-hander Staff options received minor adjustments. They are still the top choice, but not by a large margin. Wearing a 1-handed Orb with a Shield provides a similar amount of Damage, provides Block, and is usually cheaper. That said, you will still want to include the Infinity Runeword to lower Enemy Resistances, ideally worn by a Mercenary. For your personal Weapon, we recommend a Mang Song's Lesson, but if it's not within your budget range, you can also opt for the Skyfall Orb paired with Lidless Wall or Taebaek's Glory.
For your Armour, the Ormus' Robes is still the best choice, but the Chain Lightning variant can be quite expensive. Steel Carapace is also a great option. As a last resort, you can also wear Skin of the Vipermagi.
For your jewelry, there is no room for discussion. You will always want to wear the Arachnid Mesh, Mara’s Kaleidoscope, and any Rings with +1 Skills such as Wisp Projector, Kadala's Heirloom, or Bul-Kathos, although the Stone of Jordan is the best option due to the large amount of Mana it provides, which, as you already know, is your main defensive layer. The Griffon's Eye Helmet is also unbeatable by any other option, especially if you are lucky enough to land a desirable Corruption. The Occultist Gloves are the BiS due to large amounts of FCR and Mana on them, but some may prefer Dracul's Grasp just for the Life after each Kill modifier.
You won't be running around too much thanks to the Teleport, so you will have plenty of options for your Boots. Before you switch to the Energy Shield Setup completely, you will need some Resistances here; later on, Silkweave with its massive Mana will be a better option.
Charms
To no surprise, you will need Grand Charms with additional Skill Levels for your Chain Lightning. Ideally, they should improve your Hit Recovery too.
Use Small Charms to fill the gaps in your defense. Poison Resistance is the most useful here, but you can also get a bit of Life or regular Resistance in case your Mana runs dry.
You will obviously want all 3 Unique Charms: Gheed's Fortune, Hellfire Torch, and Annihilus. All provide very valuable bonuses, which reflect on their price.
Lum • Io • Sol • Eth
+33% Faster Cast Rate
+9 to Minimum Damage
-25% Target Defense
+2 to Energy Shield (Sorceress Only)
+2 to Static Field (Sorceress Only)
+50% Enhanced Defense
+10 to Vitality
+10 to Energy
Increase Maximum Mana [25-40]%
Magic Damage Taken Reduced by 7
Minimum Item Level: 80
Occurrence Rate: 5/75
Base Durability: 25
Defense: 90-170
-[10-15]% to Enemy Fire/Cold/Lightning Resistance
[50-120] Defense
All Resistances +[25-40]
Half Freeze Duration
Mercenary
The Act 2 Mercenary with his Defiance Aura boosts your survivability by a decent amount and can wield the Infinity Runeword effectively. The remaining Items are focused on defense to ensure the Conviction Aura is always active. Such Items include:
- Flickering Flame or Ferocity (Helmet)
- String of Ears or Nosferatu’s Coil (belt)
- Shaftstop or Innocence (Armour)
- Lava Gout's or Dracul Grasp (gloves)
- Rare Boots with Life, Movement Speed, and Resistance
Final Thoughts
The Chain Lightning is the staple Build of the Sorceress Class. It is fast, effective, and very enjoyable to play. It can complete all content in the game, although it is best suited for quickly farming Maps, which, for most players, is the main activity within the game.
We will continue updating this guide with future Project Diablo 2 changes and expand our PD2 content with more builds and strategies.
If you have suggestions or would like to see other builds covered, feel free to share your feedback—it helps us improve and deliver better guides.
Images used in this article are the intellectual property of Blizzard Entertainment or its corresponding owners.