 Buy/Sell
 Log in

Concentrate Barbarian Build Guide for PD2
Turn Concentrate into a deadly Magic Splash melee Build with our Project Diablo 2 Season 14 Barbarian guide.Concentrate Barbarian Build
Last Update: October 13, 2026
Introduction
The Concentrate Barbarian is one of the most interesting melee Builds to revisit. Concentrate already converts a large portion of your Physical Damage into Magic Damage, but until now only the remaining Physical portion was properly represented by the melee splash. Season 14 changes this behavior so the converted Magic Damage is included in the splash as well, giving the Skill a much stronger way to clear groups while keeping its excellent single-target profile.
At high hard Skill Levels, Concentrate converts up to 70% of its Physical Damage into Magic Damage. This gives the Build natural coverage against Physical-resistant enemies and creates an unusual melee setup where enormous Weapon Damage is converted into screen-wide mixed Physical and Magic hits. Season 13 already gave Concentrate additional melee splash radius, so the Season 14 conversion change finally makes that improved coverage much more meaningful.
Our recommended version uses a powerful two-handed Weapon, with The Cranium Basher as the main endgame choice. Its enormous Damage, Crushing Blow, and improved Season 14 Amplify Damage proc work extremely well with Concentrate. An Act 1 Mercenary carrying Faith supplies Fanaticism and solves the Build's biggest remaining weakness: the naturally slow attack animation of heavy two-handed Weapons.
Recommended Breakpoints
- Faster Hit Recovery (FHR): Aim for 48%, with 86% as a high-end defensive target
- Faster Cast Rate (FCR): FCR does not affect Concentrate; 37% is a useful quality-of-life target for faster Warcries if it comes naturally
- Attack Rating: There is no fixed breakpoint. Concentrate and Two Handed Mastery provide substantial AR, so use Advanced Stats to keep your chance to hit Map monsters consistently high
Stat Allocation
- Strength: Enough for your Weapon and other gear; Softcore setups can invest additional Points for more two-handed Weapon Damage
- Dexterity: Enough to meet gear requirements
- Vitality: Invest most remaining Points
- Energy: Nothing
The Cranium Basher has a very high Strength requirement, so this Build naturally ends up with more Strength than most Barbarians. Once the final equipment is covered, Vitality is the safest destination for remaining Points. Aggressive Softcore setups can move additional Points back into Strength because two-handed Mauls gain excellent Damage scaling from it.
Pros
- Season 14 Magic splash greatly improves Concentrate's Mapping performance
- Excellent mixed Physical and Magic Damage coverage
- Very high Defense and Attack Rating while attacking
- Strong single-target Damage and Crushing Blow for bosses and elites
- Leap Attack provides excellent built-in mobility
Cons
- Loses the safety of a Shield and can still take sudden Damage spikes in Maps
- High-end Weapons, sockets, and a Faith Mercenary make optimization expensive
You can also visit this page to check our other Project Diablo 2 Builds
Skill Trees
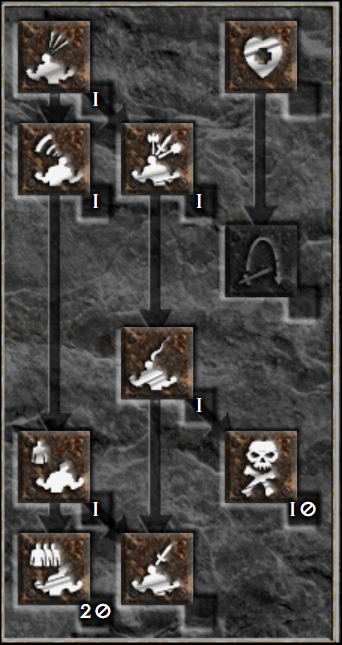
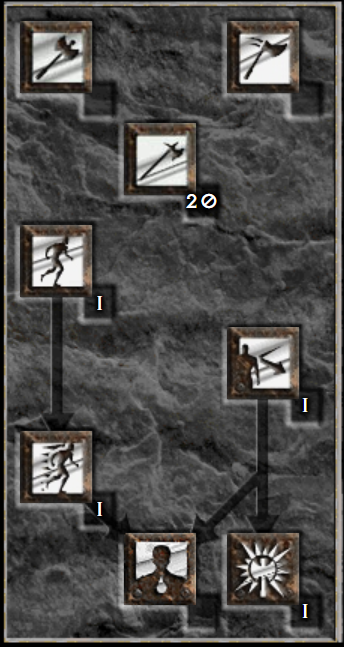
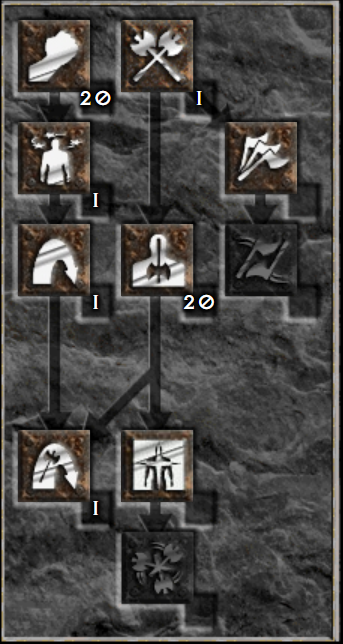
For a fresh character, Leap Attack is an excellent way to level before moving fully into Concentrate. Season 14 increases its Damage per level and strengthens its synergies, making campaign progression with a large two-handed Weapon very comfortable. Concentrate becomes available early and can already be used against tougher targets, but the Build feels much better once a strong Weapon and enough Attack Speed are available.
For the final setup, max Concentrate, Bash, Battle Command, and Two Handed Mastery. Bash and Battle Command are Concentrate's main Damage synergies, while Battle Command also provides its powerful party buff and additional Skill Levels at higher hard Point thresholds. Two Handed Mastery remains essential despite its Season 14 Damage reduction because it adds Weapon Damage, splash radius, Crushing Blow, and Crushing Blow Efficiency.
After these four Skills are complete, invest the remaining Points into Grim Ward. Its large Enhanced Damage and Attack Rating bonus is one of the strongest ways to improve Mapping once the first corpse is available. Keep one Point in Leap and Leap Attack for movement, together with one Point in Combat Reflexes, Increased Speed, Iron Skin, Natural Resistance, and the Warcry prerequisites needed for Battle Command and Grim Ward.
At Level 99, a practical setup ends around 20 Concentrate, 20 Bash, 20 Battle Command, 20 Two Handed Mastery, and 18 Grim Ward, with the remaining Points covering prerequisites and one-point utility Skills. If you want more Life or Physical Damage Reduction, some late Grim Ward Points can be moved into Combat Reflexes or Iron Skin.
Gear
The Cranium Basher is our primary endgame Weapon. The Thunder Maul combines huge base Damage with 75% Crushing Blow, 30% IAS, Resistances, and a Season 14 buff that raises its Amplify Damage proc chance to 14%. An Ethereal version with a strong corruption and several sockets is an exceptional chase item. High-end Rare or Crafted two-handed Weapons can compete when they combine enormous Enhanced Damage with IAS, Maximum Damage, useful procs, and sockets.
Asylum is the most interesting alternative created by the new Magic splash interaction. Its Level 17-20 Sanctuary Aura reduces enemy Magic Resistance, while +4 All Skills and high Enhanced Damage fit Concentrate extremely well. Community testing is also experimenting with Asylum alongside Heavenly Garb for another Sanctuary Aura source. This Magic-focused version is promising, but Cranium Basher remains the safer recommendation while Season 14 Beta testing continues.
Arreat's Face is the best balanced Helmet, offering Barbarian and Combat Skills, 30% FHR, Attack Rating, Leech, Attributes, and Resistances. Veil of Steel trades some utility for large Enhanced Damage and excellent defenses. Season 14 also makes Rare Barbarian Helms considerably more interesting: dropped Rares can gain stronger affixes, while non-Circlet Helmets can roll up to 80% Enhanced Damage. A strong +2 Barbarian / +3 Concentrate Rare can therefore become a serious endgame option.
Fortitude is the default Body Armour. Its 250-300% Enhanced Damage scales the Weapon before Concentrate converts part of the hit to Magic, while Defense, Life, Resistances, and PDR keep the two-handed setup durable. Stone is a cheaper defensive option if Map Damage spikes are a problem. Heavenly Garb is reserved for the experimental Sanctuary-focused Asylum setup.
For Gloves, Steelrend supplies a large amount of Enhanced Damage and Crushing Blow. Laying of Hands is excellent against Demons and can help IAS setups that do not yet have Faith. Season 14 greatly improves the ceiling of Rare or Crafted Gloves, which can combine IAS with a new Enhanced Damage prefix and powerful offensive Rare modifiers such as Deadly Strike or Crushing Blow.
Nosferatu's Coil is the main offensive Belt thanks to IAS, Deadly Strike, Strength, and Life Leech. String of Ears and Verdungo's Hearty Cord are excellent alternatives when additional Physical Damage Reduction is more important than Damage.
Gore Rider is the standard offensive Boots choice with Crushing Blow, Deadly Strike, and Open Wounds. War Traveler is another strong option because its flat Damage scales extremely well with a high-ED two-handed setup. Rare Boots are ideal when Resistances or FHR still need to be completed.
Highlord's Wrath provides +1 Skill, IAS, and Deadly Strike and remains the strongest general Amulet. The IAS becomes less important once Faith already puts Cranium Basher at its fastest practical breakpoint, but the rest of the package remains excellent. Atma's Scarab is more attractive with Weapons that do not already provide Amplify Damage.
Raven Frost covers Cannot Be Frozen together with useful Attack Rating and Dexterity. The second Ring can be Bul-Kathos' Death Band for Enhanced Damage and PDR or a strong Rare/Crafted Ring with Attack Rating, dual Leech, Strength, Life, and Resistances.
Charms
Maximum Damage / Attack Rating Charms are the main offensive choice. Start with a Barbarian Hellfire Torch and Annihilus, then fill most of the remaining inventory with Max Damage and AR Charms, ideally with Life. Mastery Grand Charms can be useful during progression, but direct Weapon Damage scales the entire Concentrate package more efficiently once your core Skills are established.
Season 14 also introduces Magic Damage prefixes on Jewels. These are worth testing in an Asylum/Sanctuary version, while the standard Cranium Basher setup should continue prioritizing Enhanced Damage, IAS when required, and defensive socket choices.
Mercenary
An Act 1 Vigor Mercenary with Faith is our recommended support choice. Fanaticism is extremely important for a slow Thunder Maul and allows Cranium Basher to reach the fastest practical Concentrate animation without sacrificing several equipment slots to IAS. Vigor also improves Map movement, while Templar's Might adds Might Aura and received substantially more Strength and Vitality in Season 14.
If you use a naturally faster Weapon and can solve the IAS breakpoint elsewhere, other Mercenaries become possible. The Act 4 Light Mercenary and Sanctuary-based setups are especially interesting for Magic-heavy Concentrate, although giving up Faith usually costs too much attack speed for the standard Cranium Basher version.
- Faith (Weapon)
- Vampire Gaze or Andariel's Visage (Helmet)
- Templar's Might (Armour)
- Rare/Crafted Gloves with IAS, Life Leech, and Resistances (Gloves)
- String of Ears or Verdungo's Hearty Cord (Belt)
- Rare Boots with Faster Run/Walk and Resistances (Boots)
Final Thoughts
Season 14 fixes the biggest problem that kept Concentrate Barbarian behind more popular melee setups. The Build already had enormous single-hit Damage, high Attack Rating, excellent Defense, and natural Magic conversion; allowing that converted Damage to splash finally gives those strengths a much better way to translate into Mapping.
The Build still rewards careful gearing. A slow two-handed Weapon feels dramatically better once Fanaticism solves its attack speed, and strong Weapons, Enhanced Damage, Grim Ward, Crushing Blow, and good positioning all matter. Cranium Basher provides the most straightforward high-end route, while Asylum opens a much more experimental Sanctuary-focused version for players who want to push the new Magic splash mechanic further.
We will continue updating this guide with future Project Diablo 2 changes and expand our PD2 content with more builds and strategies.
If you have suggestions or would like to see other builds covered, feel free to share your feedback - it helps us improve and deliver better guides.
Images used in this article are the intellectual property of Blizzard Entertainment or its corresponding owners.