 Buy/Sell
 Log in


Dragondin/Holy Fire Aura Paladin PD2 Build
Few Builds feel this effortless once completed - simply charge through the Map while Holy Fire keeps destroying everything nearby.Dragondin/Holy Fire Aura Paladin Build
Last Update: September 22, 2026
Introduction
Dragondin, also known as the Holy Fire Paladin, is an aggressive elemental melee Build that turns every movement through the battlefield into a constant wave of Fire Damage. Instead of relying entirely on direct attacks, the Build stacks powerful sources of Holy Fire from equipment and amplifies them through its synergies, allowing nearby enemies to take repeated Fire Damage before you even reach them. Charge provides exceptional mobility between packs, while Zeal or Sacrifice can be used to quickly finish tougher targets that survive the aura pulses. This creates a very distinctive playstyle where entire groups begin collapsing as you move through the Map, while your melee attacks handle elites and bosses.
The Build becomes especially powerful once its expensive Runeword setup comes together, as multiple sources of Holy Fire combine with Conviction and Fire-focused modifiers to dramatically increase both pulse and melee Damage. Dragondin's power mostly comes from scaling the elemental Damage added by its Aura and reducing enemy Fire Resistance. This makes it an exceptionally strong Mapping Build with excellent mobility, wide passive coverage, and enough single-target Damage to deal comfortably with tougher enemies. Its high gear requirements make it a true endgame project, but once completed, few Paladin Builds offer such a satisfying combination of speed, AoE, and constant on-screen destruction.
Recommended Breakpoints
- Faster Hit Recovery (FHR): 48% minimum, 86% recommended
- Attack Speed (IAS): Reach the fastest practical breakpoint for your chosen attack and Weapon base; Sacrifice is the preferred main attack for dense Maps, while Charge is mainly used for mobility
- Attack Rating: Around 6,000-8,000 AR is usually sufficient, as Conviction also lowers enemy Defense. More can still help against tougher targets
Stat Allocation
- Strength: Enough to meet gear attribute requirements
- Dexterity: Enough for gear and, if desired, a comfortable Block Chance with your Shield
- Vitality: Invest all
- Energy: Nothing
Most remaining Stat Points should go into Vitality. Dexterity is useful if you are building around high Block, but the Build does not need to invest heavily into Attack Rating because Conviction significantly reduces enemy Defense. Avoid overspending on Strength or Dexterity once your equipment requirements are covered.
Pros
- Huge AoE coverage even before attacking
- Conviction greatly improves Damage against resistant enemies
- Very fast movement with Charge
- Strong scaling from Fire Skill Damage and Enemy Fire Resistance reduction
Cons
- Very expensive endgame setup
- Much weaker before the core Holy Fire equipment is assembled
You can also visit this page to check our other Project Diablo 2 Builds
Skill Trees
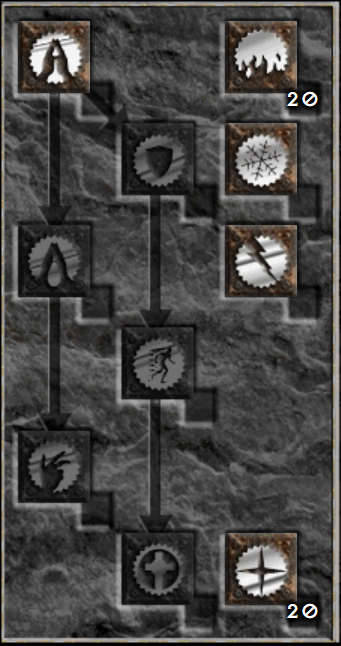
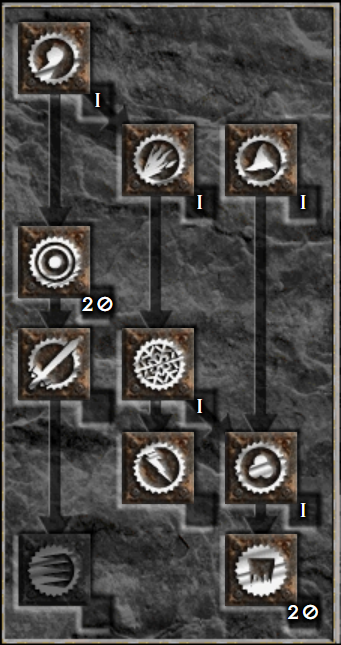
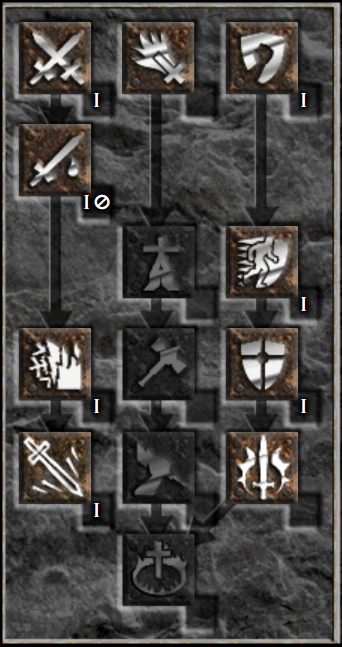
The Dragondin is not a Build you should normally level from the beginning. It is much more efficient to progress through Normal, Nightmare, and early Hell using a cheaper Paladin setup such as Holy Bolt, Sanctuary, Vengeance, or a conventional melee Build, and then respec once the core Holy Fire equipment is ready. The final setup relies heavily on aura levels granted by items, so switching too early can leave the character noticeably weaker than a properly geared leveling Build. Even a single Dragon is usually not enough to justify the transition, while setups using Dragon together with Flamebellow can serve as an intermediate step before completing the full Dragon + Dragon + Hand of Justice combination.
Once you make the switch, do not invest hard Points into Holy Fire itself. The aura used by the final Build comes from your equipment, and your own Holy Fire does not stack with those aura-on-equip sources in the way you want. Instead, max Resist Fire, Blessed Aim, and Salvation, as these hard-point synergies directly increase the Damage of the Holy Fire granted by your gear. Conviction should also be maxed and used as your active Aura to reduce enemy Fire Resistance and Defense.
After completing the three Holy Fire synergies and Conviction, spend the remaining Points according to your preferred playstyle. Sacrifice is the offensive choice and performs especially well in dense Maps, where its explosion mechanic can quickly chain through tightly packed enemies. You do not need to max it immediately; around 10-15 Points already works well, while additional levels continue improving its Damage and eventually increase its effective clearing radius. If you prefer a safer setup, those remaining Points can instead be invested into Holy Shield for additional Defense and better Block efficiency.
Gear
Hand of Justice is the defining Weapon for the finished Dragondin. Together with two copies of Dragon, it provides the stacked item-based Holy Fire Aura that the entire Build is designed around. A Phase Blade is usually the preferred base because of its excellent Attack Speed and indestructibility, while Hand of Justice also provides IAS, Enhanced Damage, Deadly Strike, Life Leech, and Enemy Fire Resistance Reduction. Before the full setup is complete, Flamebellow can be used as a transitional option, but the final one-handed setup is faster and allows you to benefit from a Shield.
For Body Armour, Dragon is mandatory in the standard endgame version. It grants another level 12 Holy Fire Aura and forms one third of the core aura-stacking package. Since the Build cannot replace this slot without losing a major portion of its identity and Damage, your choice here is mainly about finding a good defensive base.
The Shield should also be Dragon, ideally made in a high-resistance Paladin Shield base. This completes the standard Hand of Justice + Dragon + Dragon setup and raises the total level of the item-granted Holy Fire Aura substantially. A strong base with innate All Resistances is especially valuable because several other equipment slots are heavily committed to offensive Fire scaling.
Kira's Guardian is one of the strongest Helmets for the Build because Enemy Fire Resistance Reduction directly improves both the Holy Fire pulse and the Fire Damage added to your melee attacks. A multi-socket Kira's filled with Fire Rainbow Facets is one of the most powerful offensive upgrades available, while its Resistances also help compensate for the restrictive Runeword setup. Older Dragondin setups sometimes used Andariel's Visage for IAS and sockets, but Kira's is generally the more natural pure Fire option.
Hellmouth is the standout Gloves choice. Its Enemy Fire Resistance Reduction and added Fire Damage directly support the Build's primary Damage type, making it considerably more valuable than generic melee Gloves. Because the rest of the setup already provides strong Attack Speed options, Hellmouth is usually worth building around.
For the Belt, Nosferatu's Coil is one of the best offensive choices when additional IAS is needed for your melee breakpoint, and its Life Leech is useful for sustain. Verdungo's Hearty Cord is the better defensive alternative when Attack Speed is already covered, while String of Ears can also be used if you want additional Physical Damage Reduction and Leech.
Tearhaunch remains a surprisingly common and effective Boots choice for Dragondin setups, mainly because the Build values Paladin utility and mobility more than conventional physical melee modifiers. Merman's Sprocket is another strong mobility-oriented option with exceptional Faster Run/Walk, while Rare Boots can be used to solve Resistances and FHR if the rest of your gear is heavily optimized for Fire Damage.
The Rising Sun is the first choice for offensive Amulet. It provides additional Fire Damage together with Enemy Fire Resistance Reduction, both of which directly improve the Build's main source of Damage. A strong Rare or Crafted Amulet can be considered when you urgently need Resistances or Attributes, but it is difficult to match the offensive value of Rising Sun on a dedicated Holy Fire setup.
For Rings, Raven Frost is an excellent first choice when you need Cannot Be Frozen, while its Dexterity and Attack Rating are also useful for melee combat. The second Ring can be Bul-Kathos' Wedding Band or Stone of Jordan for additional Skill Levels, although a strong Rare or Crafted Ring with Life Leech, Attack Rating, Resistances, and Attributes can be more practical depending on the rest of your setup. Since most of the Build's Damage comes from item-based Holy Fire, Rings should primarily solve survivability and utility.
Charms
Charms for the Dragondin should primarily increase the Damage of the item-granted Holy Fire Aura. A Paladin Hellfire Torch and Annihilus remain excellent for Attributes and Resistances, but traditional Skill Grand Charms are not especially important because the Build's Holy Fire comes from equipment and its synergies only gain Damage from hard Skill Points. Instead, Large Charms with increased Fire Skill Damage are one of the strongest offensive choices and directly improve both the Aura pulses and the Fire Damage added to your attacks.
Fill the remaining inventory with Small Charms providing Life, Resistances, Faster Hit Recovery, or Attack Rating depending on what your equipment is missing. Resistances are particularly valuable because the mandatory Hand of Justice + Dragon + Dragon setup leaves relatively few flexible gear slots. If your chance to hit still feels inconsistent, a strong Attack Rating Charm can also be worthwhile, although Conviction already lowers enemy Defense substantially.
Mercenary
An Act 1 Vigor Mercenary equipped with Pus Spitter is one of the most useful support options for the Dragondin. Vigor further improves your already excellent mobility, while Pus Spitter can apply Lower Resist, providing another way to reduce enemy Fire Resistance on top of your own Conviction Aura. Recent Holy Fire Paladin players continue to recommend this setup specifically for aura-based fire builds.
An Act 2 Defensive Mercenary is a reasonable alternative when you want a sturdier frontline, but Infinity is much less important on a true Dragondin because you already run a high-level Conviction yourself. For this reason, the Mercenary is generally better used for mobility, additional resistance reduction, or defensive support rather than duplicating your main Aura.
- Pus Spitter (Weapon)
- Flickering Flame or Vampire Gaze (Helmet)
- Fortitude, Shaftstop, or another durable Armour (Armour)
- Lava Gout or durable Rare/Crafted Gloves (Gloves)
- String of Ears or Verdungo's Hearty Cord (Belt)
- Rare Boots with Resistances and defensive modifiers (Boots)
Final Thoughts
Few Builds capture the Auradin fantasy as completely as the Dragondin. Once Hand of Justice and both Dragon Runewords are assembled, simply moving through a Map constantly damages everything around you, while Sacrifice, Charge, and Conviction take care of enemies that survive the initial waves of Fire. The enormous cost of the setup makes it a true endgame project, but it also gives the Build a very clear payoff: exceptional mobility, huge elemental coverage, and a playstyle unlike almost anything else in Project Diablo 2.
We will continue updating this guide with future Project Diablo 2 changes and expand our PD2 content with more builds and strategies.
If you have suggestions or would like to see other builds covered, feel free to share your feedback - it helps us improve and deliver better guides.
Images used in this article are the intellectual property of Blizzard Entertainment or its corresponding owners.