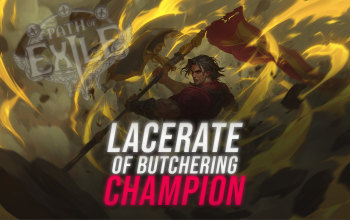
Lacerate of Butchering Champion
An insanely powerful Setup for the Champion Ascendency using Lacerate of Butchering that combines several synergistic mechanics.Lacerate of Butchering
Champion Build
Updated for Patch 3.28
The Best Crafty Guides by Odealo
| Guide notes | |||
| April 08, 2026 -Build created |
|||
| Build overview | |||
| Tags: [MELEE] [PHYSICAL] [LIFE] | |||
|
Budget: Defenses: |
|
Boss DPS: AoE: |
|
The Lacerate of Butchering is one of the hardest-hitting Melee Skills in the game. It performs two slashes that can both deal Damage to the same target. However, it has a massive downside - it uses only 40% of your regular Attack Speed, making it quite unattractive for both DPS and overall gameplay feeling. The solution is General's Cry. It is a Warcry that summons up to 6 Mirage Warriors that use this Skill for you, but only once. By doing so, you will be limited by Cooldown instead of Attack Speed.
With that in mind, there is only one Weapon worth using for such a setup - the Foulborn Uul-Netol's Kiss, which grants 500% increased Warcry Cooldown Recovery Rate. It brings down the Cooldown of the General's Cry to 0.5 seconds. You can lower it even more with the Volatile Vaal Orb and Tattoos, but at a certain point, you will be limited by the Attack Speed again. Lowering the Cooldown is still beneficial to trigger other effects. Obviously, the Warcry will be triggered automatically with the Autoexertion Gem. To create Mirages, you will also need Corpses, which can be sourced from fallen Enemies or the Desecrate Skill. It does not consume them, so you only need to create them once.
Very fast Warcries also have other advantages. Thanks to the Masteries, you will passively generate Rage, Fortify, and most importantly, the Valour, which is used to power up Banners. In this Setup, the Banners cap your Suppression and Block Chance, provide over 150% Movement Speed, and double your Physical Damage. The Banners grant those insane bonuses while placed down, and for 4 seconds after leaving that area, but they can not be automated. In most situations, you will only use the Defiance Banner for the Speed bonus.
The new Screams of the Desiccated Belt provides a permanent Shrine Effect if you don't use any Utility Flasks. In our case, you will use a Diamond Shrine to ensure your Hits are always Critical. It saves a massive amount of investments and allows the use of items such as Marylene's Fallacy to gain tons of Critical Strike Multiplier. The loss of Quicksilver Flask is not very noticeable, as you will have tons of Movement Speed from your Banner anyway.
You will naturally invest a lot into Aura Effect. By doing so, your Determination Aura will greatly improve your Armour Rating, easily reaching over 50 000 Armour. To take advantage of that, we recommend using a combination of The Fourth Vow Armour and Divine Flesh Keystone. That way, half of the Elemental Damage will be taken as Chaos, and your Armour will reduce the incoming Chaos Damage. This way your Armour will be useful against all types of Damage from Hits.
You can also check our other Path of Exile builds right over here Odealo's Crafty Guides - Full List
1. Gameplay
Hold Cyclone to create Corpses and freely pass through Enemies while your Mirage Warriors deal Damage. Use Defiance Banner every 4 seconds to reapply the Speed and Suppression Bonus. For toughter Enemies, place down Dread and War Banners too once you accumulate maximum Valour, and change your Stance to Blood. To supplement your Movement, use Frostblink.
|
|
|
|

2. Build's PROS & CONS
| PROS |
|
| CONS |
|
3. Leveling tips
This Setup requires Endgame Weapon to work. Use our Melee Duelist Leveling Guide to smoothly progress through the Campaign.
4. Final Skill Tree, Ascendancy Points, and Pantheon
Final Skill Tree:
113 Points Final Skill Tree (doesn't include Cluster Jewels)
119 Points Path of Building (PoB) link
Ascendancy points:
Preferably in that order:
- Inspirational
- Worthy Causes
- Worthy Foe
- The Unseen Hand (Nameless Bloodline)
Pantheon:
Major God: Soul of Arakaali: 10% reduced Damage taken from Damage Over Time, +40% Chaos Resistance against Damage Over Time
Minor God: Soul of Ralakesh: 25% reduced Physical Damage over Time taken while moving, Moving while Bleeding doesn't cause you to take extra Damage
5. Final Gems links
| [DPS] Lacerate of Butchering setup | |
 |
Lacerate of Butchering - very slow but very hard-hitting Attack that deals Damage in a very long line twice. |
 |
General's Cry - a Warcry that awakens up to 6 Mirage Warriors that perform a linked Attack once. |
 |
Autoexertion - triggers linked Warcry automatically, but reserves a portion of your Mana. |
 |
Melee Physical Damage Support |
 |
Brutality Support |
 |
Pulverise Support |
 |
Maim/Fortify/Overexertion/Cruelty Support - Imbue option |
| [Utility] Cyclone setup | |
 |
Cyclone - allows you to pass through monsters, triggers useful Spells, and Leeches Life. |
 |
Desecrate - your Mirage Warriors require Corpses to spawn. |
 |
Cast while Channeling Support |
 |
Infused Channeling Support |
|
Maim Support |
 |
Lifetap Support |
| [Utility] Banner setup | |
 |
Defiance Banner - your main Banner, it grants tons of Movement Speed and Suppression Chance. You should upkeep this buff permanently. |
 |
War Banner - greatly increases your Physical Damage. It is only useful against the hardest Bosses. |
 |
Dread Banner - grants Block Chance and Life Recovery on Block. You can have two Banner Effects lingering permanently up if played optimally while moving, or all 3 if standing in one place. |
|
Lifetap Support |
| [Utility] Aura setup | |
 |
Determination - grants plenty of Armour and greatly improves it further. |
 |
Pride - massively increases the Physical Damage taken by nearby Enemies. |
 |
Flesh and Stone - improves your DPS or lowers the Damage taken by you from nearby Enemies. |
 |
Blood and Sand - improves your Damage or AoE. You can fit in this Aura only if you get a special Corrupted Implicit on your Helmet. |
 |
Enlighten Support |
| [UTILITY] Molten Shell setup | |
 |
Molten Shell - grants a bit of Armour and forms a protective barrier that absorbs incoming Damage. |
 |
Automation - triggers linked Spells whenever it is ready. You can also use Cast when Damage Taken Support instead. |
| [UTILITY] Mobility setup | |
 |
Frostblink - an instant teleport which you can use without interrupting Cyclone. It has a short Cooldown. |
|
Lifetap Support |
| [UTILITY] Berserk setup | |
 |
Berserk - improves the effect of Rage on you, but drains it at an accelerating rate. Use it to burst down Bosses. |
|
|
5. Gear Setup
The only mandatory Item is the Foulborn Uul-netol Kiss, which allows you to use General's Cry so often. Other Uniques are very beneficial, but not crucial for the core Setup. The Screams of the Desiccated Belt with the permanent Diamond Shrine makes scaling Critical Strikes very easy, but it can be done with just a regular Belt as well. On your Rare Items, you will primarily seek maximum Life and Resistances. If played optimally, you could skip Elemental Resistance on your Gear as each active Banner provides over 100% to all Elemental Resistance, but it is not recommended.
|
Stat priorities on items:
|
 (Weapon) Foulborn Uul-Netol's Kiss - a Foulborn version greatly lowers the Cooldown of your Warcries. You can Corrupt it to make it even faster. You can also replace the Vulnerability on Hit with another Foulborn modifier and use a level 20 Curse for greater effect. (Weapon) Foulborn Uul-Netol's Kiss - a Foulborn version greatly lowers the Cooldown of your Warcries. You can Corrupt it to make it even faster. You can also replace the Vulnerability on Hit with another Foulborn modifier and use a level 20 Curse for greater effect. |
|
| (230-270)% increased Physical Damage 15% reduced Attack Speed Curse Enemies with Vulnerability on Hit Exerted Attacks deal 200% increased Damage Exerted Attacks Knock Enemies Back on Hit Foulborn modifiers: 500% increased Warcry Cooldown Recovery Rate Warcries Exert 1 additional Attack |
|
 (Body Armour) The Fourth Vow - with this Armour, you will reduce the incoming Chaos Damage with your Armour Rating. Pair it with the Glorious Vanity Jewel to apply it to Elemental Damage as well. (Body Armour) The Fourth Vow - with this Armour, you will reduce the incoming Chaos Damage with your Armour Rating. Pair it with the Glorious Vanity Jewel to apply it to Elemental Damage as well. |
|
| Physical Damage taken bypasses Energy Shield (150-250)% increased Armour and Energy Shield +(17-29)% to Chaos Resistance Regenerate 3% of Life per second Armour also applies to Chaos Damage taken from Hits |
|
 (Helmet) Abyssus - grants tons of Damage, but also makes you more vulnerable against Physical Damage. Try to Corrupt it to reduce the Reservation Cost of socketed Gems. (Helmet) Abyssus - grants tons of Damage, but also makes you more vulnerable against Physical Damage. Try to Corrupt it to reduce the Reservation Cost of socketed Gems. |
|
| +(20-25) to all Attributes Adds 40 to 60 Physical Damage to Attacks +(100-125)% to Melee Critical Strike Multiplier (100-120)% increased Armour (40-50)% increased Physical Damage taken |
|
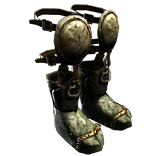 (Boots) Rare Boots - other than the usual defensive modifiers, you should get plenty of Movement Speed and Ailment Avoidance here. (Boots) Rare Boots - other than the usual defensive modifiers, you should get plenty of Movement Speed and Ailment Avoidance here. |
|
| Min. requirements: +100 to Maximum Life 30% increased Movement Speed 70% Total Fire and Chaos Resistances 500 Armour Rating Optional affixes: #% increased Action Speed % chance to Avoid Elemental Ailments % increased Life Regeneration rate |
|
 (Gloves) Rare Gloves - your Gloves are extremely basic; you only need a lot of maximum Life, Armour, and Resistance. The Life Regeneration Rate is also useful to have. (Gloves) Rare Gloves - your Gloves are extremely basic; you only need a lot of maximum Life, Armour, and Resistance. The Life Regeneration Rate is also useful to have. |
|
| Min. requirements: +100 to Maximum Life 70% Total Fire and Chaos Resistances 800 Armour Rating Optional affixes: % increased Life Regeneration rate #% chance to Intimidate Enemies for 4 seconds on Hit #% chance to Impale Enemies on Hit with Attacks |
|
 (Belt) The Magnate - a budget option, this Belt offers a high amount of Damage and Flask sustain. You can reach 400 Strength easily if you don't use Tattoos. (Belt) The Magnate - a budget option, this Belt offers a high amount of Damage and Flask sustain. You can reach 400 Strength easily if you don't use Tattoos. |
|
| +(40-50) to Strength +(20-25)% to all Elemental Resistances 50% increased Flask Charges gained 10% chance to deal Double Damage while you have at least 200 Strength 5% chance to deal Triple Damage while you have at least 400 Strength |
|
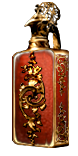
 (Belt) Screams of the Desiccated - by picking the Diamond Shrine here, you will gain tons of Damage through Critical Strikes, but you can't use Utility Flasks. (Belt) Screams of the Desiccated - by picking the Diamond Shrine here, you will gain tons of Damage through Critical Strikes, but you can't use Utility Flasks. |
|
| +(25-40) to maximum Life +(23-32) to Intelligence +(23-37)% to Chaos Resistance You have Diamond Shrine Buff while affected by no Flasks |
|
 (Amulet) Marylene's Fallacy - this Amulet grants an insane amount of Critical Strike Multiplier and Culling Strike Effect. Thanks to the Diamond Shrine, the downside does not matter. (Amulet) Marylene's Fallacy - this Amulet grants an insane amount of Critical Strike Multiplier and Culling Strike Effect. Thanks to the Diamond Shrine, the downside does not matter. |
|
| +(20-30) to Intelligence +(80-120) to Accuracy Rating +(210-240)% to Global Critical Strike Multiplier +(80-100) to Evasion Rating (10-15)% increased Light Radius 40% less Critical Strike Chance Critical Strikes have Culling Strike |
|
 (Amulet) Aul's Uprising - if you can't get the Diamond Shrine Belt, use this Amulet to gain a free Pride or Determination Aura. (Amulet) Aul's Uprising - if you can't get the Diamond Shrine Belt, use this Amulet to gain a free Pride or Determination Aura. |
|
| +(10-16) to all Attributes+(20-30) to Strength (15-20)% increased Armour +(50-70) to maximum Life Nearby Enemies have 10% reduced Stun and Block Recovery <Random Strength aura> has no Reservation |
|
 (Ring) Woespike - simply grants a lot of Damage for any Build that uses Impale. It also grants a lot of Dexterity, which is useful for Attribute Requirements. (Ring) Woespike - simply grants a lot of Damage for any Build that uses Impale. It also grants a lot of Dexterity, which is useful for Attribute Requirements. |
|
| Adds (3-4) to (10-14) Physical Damage to Attacks +(25-40) to Strength and Dexterity Adds (8-12) to (18-24) Physical Damage to Attacks (10-20)% chance to Impale Enemies on Hit with Attacks (50-40)% less Impale Duration (20-30)% chance on Melee Hit for the Strongest Impale on target to last for 1 additional Hit |
|
 (Ring) Rare Ring - here look for maximum Life and Resistance. You will also need Mana Cost Reduction. You can include Critical Strike Multiplier from Essence, but it is hardly necessary and makes it much more expensive. (Ring) Rare Ring - here look for maximum Life and Resistance. You will also need Mana Cost Reduction. You can include Critical Strike Multiplier from Essence, but it is hardly necessary and makes it much more expensive. |
|
| Min. requirements: +80 to Maximum Life 70% Total Elemental and Chaos Resistances Non-Channelling Skills have -(7-6) to Total Mana Cost Optional affixes: % of Damage taken Recouped as Life % to Global Critical Strike Multiplier |
|
 (Jewel) Large Cluster Jewel - the Devastator Notable grants a source of Explosion, which is very useful for better Clear Speed. The Run Through is the best Notable for Damage. The third Notable should be skipped to save Points. You can also use Physical Cluster to get additional Resistances and Armour. (Jewel) Large Cluster Jewel - the Devastator Notable grants a source of Explosion, which is very useful for better Clear Speed. The Run Through is the best Notable for Damage. The third Notable should be skipped to save Points. You can also use Physical Cluster to get additional Resistances and Armour. |
|
| Recommended Notables: 1 Added Passive Skill is Devastator 1 Added Passive Skill is Run Through 1 Added Passive Skill is Smite the Weak 1 Added Passive Skill is Battle-Hardened 1 Added Passive Skill is Force Multiplier 1 Added Passive Skill is Master the Fundamentals |
|
 (Jewel) Medium Cluster Jewel - the Attack performed by Mirage Warriors counts as Exerted, so the Rattling Below Notable grants a lot of Damage. You should also get the Lead by Example to gain Onslaught Buff and Warning Call to improve Armour. (Jewel) Medium Cluster Jewel - the Attack performed by Mirage Warriors counts as Exerted, so the Rattling Below Notable grants a lot of Damage. You should also get the Lead by Example to gain Onslaught Buff and Warning Call to improve Armour. |
|
| Recommended Notables: 1 Added Passive Skill is Rattling Below 1 Added Passive Skill is Lead by Example 1 Added Passive Skill is Warning Call |
|
 (Jewel) Watcher's Eye - the modifiers for Determination and Pride can be very powerful, especially if you can mix them together. (Jewel) Watcher's Eye - the modifiers for Determination and Pride can be very powerful, especially if you can mix them together. |
|
| (4-6)% increased maximum Energy Shield (4-6)% increased maximum Life (4-6)% increased maximum Mana <Two or Three random aura modifiers> Recommended Aura modifiers: (8-12)% chance to deal Double Damage while using Pride 25% chance to Impale Enemies on Hit with Attacks while using Pride Impales you inflict last 2 additional Hits while using Pride (40-60)% increased Physical Damage while using Pride +(600-1000) to Armour while affected by Determination (5-8)% additional Physical Damage Reduction while affected by Determination You take (60-40)% reduced Extra Damage from Critical Strikes while affected by Determination |
|
 (Jewel) Glorious Vanity - the Divine Flesh Keystone grants extra maximum Chaos Resistance and converts 50% of incoming Elemental Damage to be taken as Chaos, which will be lowered by your Armour thanks to the Forth Vow. (Jewel) Glorious Vanity - the Divine Flesh Keystone grants extra maximum Chaos Resistance and converts 50% of incoming Elemental Damage to be taken as Chaos, which will be lowered by your Armour thanks to the Forth Vow. |
|
| Bathed in the blood of (100-8000) sacrificed in the name of Xibaqua Passives in radius are Conquered by the Vaal Historic |
|
 (Jewel) The Light of Meaning - you can use this Jewel to easily cap your Chaos Resistance. With better gear, you should get plenty of extra Physical Damage instead. (Jewel) The Light of Meaning - you can use this Jewel to easily cap your Chaos Resistance. With better gear, you should get plenty of extra Physical Damage instead. |
|
| Passive Skills in Radius also grant +4% to Chaos Resistance Passive Skills in Radius also grant 6% increased Physical Damage |
|
 (Jewel) Unnatural Instinct - greatly magnifies the bonuses granted by the Light of Meaning Jewel, and picks up plenty of Damage and AoE along the way. (Jewel) Unnatural Instinct - greatly magnifies the bonuses granted by the Light of Meaning Jewel, and picks up plenty of Damage and AoE along the way. |
|
| Allocated Small Passive Skills in Radius grant nothing Grants all bonuses of Unallocated Small Passive Skills in Radius |
|
 (Jewel) Ancestral Vision - a fully charged up Defiance Banner grants over 200% Spell Suppression Chance, which can be turned into Elemental Ailment Immunity with this Jewel. At a lower budget, you might lack some Aura Effect boosts, so the remaining Avoidance should be acquired via Boots. (Jewel) Ancestral Vision - a fully charged up Defiance Banner grants over 200% Spell Suppression Chance, which can be turned into Elemental Ailment Immunity with this Jewel. At a lower budget, you might lack some Aura Effect boosts, so the remaining Avoidance should be acquired via Boots. |
|
| +(5-10) to Dexterity Modifiers to Chance to Suppress Spell Damage also apply to Chance to Avoid Elemental Ailments at 50% of their Value |
|
 (Jewel) Thread of Hope - this Jewel allows you to spend your Passive Points more efficiently by picking up only the most important Notables in its radius. (Jewel) Thread of Hope - this Jewel allows you to spend your Passive Points more efficiently by picking up only the most important Notables in its radius. |
|
| Only affects Passives in Massive Ring Passive Skills in Radius can be Allocated without being connected to your tree Passage -(20-10)% to all Elemental Resistances |
|
  (Jewel) Forbidden Flesh&Flame - this set of Jewels allows you to borrow a notable from other Ascendencies; you should use Bane of Legends for extra damage or Brutal Fervour for survivability. Keep in mind that the very expensive Fatal Fervour Notable does not work with the Mirage Warriors. (Jewel) Forbidden Flesh&Flame - this set of Jewels allows you to borrow a notable from other Ascendencies; you should use Bane of Legends for extra damage or Brutal Fervour for survivability. Keep in mind that the very expensive Fatal Fervour Notable does not work with the Mirage Warriors. |
|
| Allocates <random Ascendancy Notable> if you have the matching modifier on Forbidden Flame/Flesh | |
|
The Screams of the Desiccated works only if you are not under the effect of any Flask, so you can only use Life Flask with the instant Recovery modifier.
|
|
 |
|
|
If you have any other build requests please leave that in the comments below. We are always open to suggestions and constructive feedback.
Pictures used in this article are the intellectual property of Grinding Gear Games.
