 Buy/Sell
 Log in

Poison Nova Necromancer Build Guide for PD2
Flood the screen with Poison, reposition instantly, and keep the Map moving with Poison Nova Necromancer, a pure momentum build.Poison Nova Necromancer Build
Last Update: September 24, 2026
Introduction
Poison Nova Necromancer is a fast Mapping caster built around covering entire groups with a single expanding wave of Poison and moving immediately toward the next pack. Poison Nova delivers excellent 360-degree coverage, while Lower Resist, high Poison Skill Damage, and Enemy Poison Resistance reduction allow the Build to scale far beyond its basic Skill Levels. Combined with Blood Warp, this creates an extremely fluid playstyle where you constantly reposition into dense groups, release Nova, and continue moving while Poison finishes the enemies behind you.
The Build supports several strong endgame directions, ranging from the classic Death's Web and Trang-Oul's Wing setup to more aggressive two-handed configurations built around Skull Collector, high Faster Cast Rate, and large amounts of Poison Rainbow Facets. Both approaches revolve around the same goal: stacking enough Poison scaling to make each Nova application decisive while maintaining the mobility and casting speed needed for continuous Mapping. With strong gear, the Poison Nova Necromancer becomes a highly efficient speed-farming Build that rewards aggressive positioning, fast movement, and careful optimization of Poison Damage and penetration.
Recommended Breakpoints
- Faster Hit Recovery (FHR): 39% minimum, 56% recommended
- Faster Cast Rate (FCR): 75% minimum, 125% recommended
Stat Allocation
- Strength: Enough to meet gear attribute requirements
- Dexterity: Enough to meet gear attribute requirements
- Vitality: Little to none in optimized endgame setups
- Energy: Invest most or all remaining Points
High-end Poison Nova Necromancers commonly invest heavily into Energy because it directly improves Bone Armor's Physical Damage absorption while also increasing the Mana pool and Mana regeneration. During progression, a more balanced Vitality/Energy split can be safer until your Resistances, Life from gear, and Bone Armor uptime are established.
Pros
- Excellent 360-degree AoE coverage
- Very fast mobility through Blood Warp
- Bone Armor + Energy provides excellent protection against Physical Damage
- Particularly strong for fast lower-tier Map farming
Cons
- Single-target Damage is noticeably weaker than its pack-clearing potential
- High-end setups depend heavily on expensive Poison gear and Rainbow Facets
You can also visit this page to check our other Project Diablo 2 Builds
Skill Trees
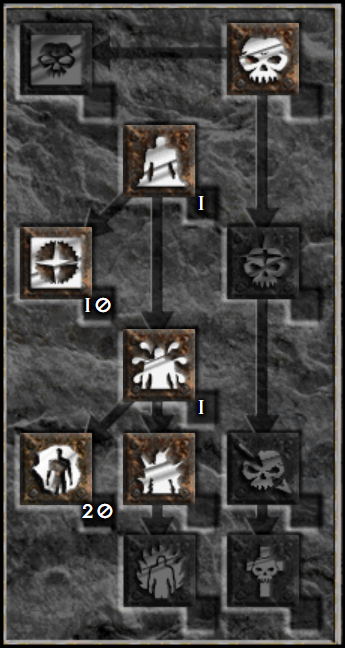
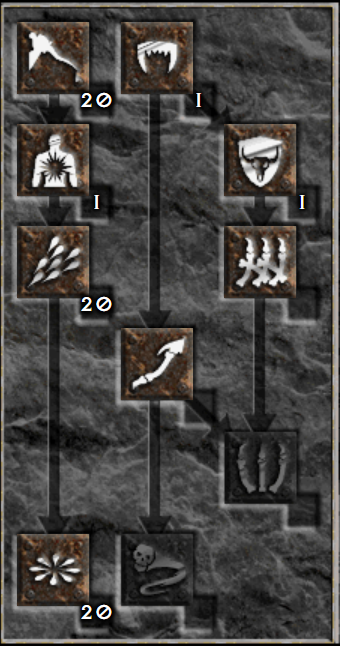
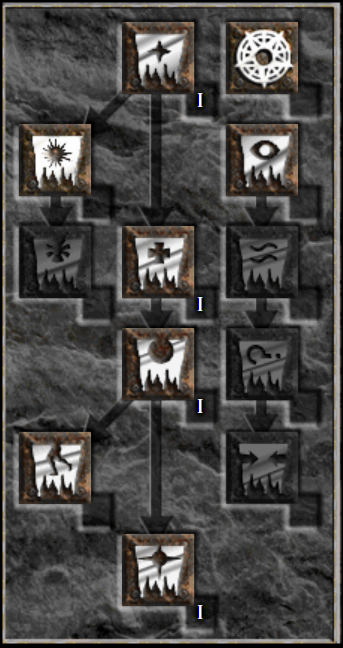
The Poison Nova Necromancer is easiest to level with a simpler caster or Summoner setup before transitioning into the final Poison package.But if you really want, Poison Strike and Desecrate can carry early progression, while Poison Nova becomes the aim clearing Skill once it is available and enough Skill Points, Mana, and Faster Cast Rate are in place.
Your main progression goal is to max Poison Nova, Desecrate, and Poison Strike. These three Skills form the offensive core and scale together, so completing the full Poison package should take priority over utility. Take Bone Armor and Lower Resist with one Point each, using Lower Resist mainly against tougher enemies and resistant targets.
After the Poison core is finished, invest heavily into Blood Warp to improve mobility and Mapping speed, eventually maxing it in the recommended setup. The remaining Points should go into Golem Mastery, reaching around 10 hard Points for stronger frontline support. Revive is optional, but the standard version skips it and keeps the Build focused on Poison Damage, mobility, and Golem utility.
Gear
Death's Web remains one of the strongest Weapons for a traditional Poison Nova Necromancer because additional Poison and Bone Skill Levels, Enemy Poison Resistance reduction, and sustain directly improve the Build's core gameplay. Pairing it with Trang-Oul's Wing creates an especially strong one-handed setup, while sockets in both pieces can be filled with Poison Rainbow Facets for additional Damage and penetration.
For the Shield, Trang-Oul's Wing is the natural partner for Death's Web. It provides Poison and Bone Skills, useful Attributes and Resistances, and becomes even more valuable when combined with additional Trang-Oul pieces. High-end corrupted versions with multiple sockets offer excellent room for Poison Facets.
A high-socket Skull Collector is the main two-handed alternative and supports a very different endgame approach. Upgrading the Staff improves its Faster Cast Rate, making the 125% FCR breakpoint considerably easier to reach, while multiple sockets allow the Build to stack a large number of Poison Facets. It also works especially well with Energy-heavy setups because of the additional Bone Armor support.
For the Helmet, a strong Rare or Crafted +2 Necromancer Circlet with Faster Cast Rate and sockets is an excellent choice for the Death's Web setup. The Staff variant can instead use Andariel's Visage, particularly when a multi-socket version allows several Poison Facets to be added.
Body Armour is highly flexible. Skullder's Ire works very well in a balanced Death's Web setup when you want additional Skills and Magic Find, while Black Hades is a powerful high-investment option for the Skull Collector variant because its sockets can be filled with Poison Facets. High-socket caster armours become especially attractive when your other slots already solve FCR and Resistances.
Trang-Oul's Claws are the standard Gloves choice. Faster Cast Rate is important for both the 75% and 125% setups, and the Gloves fit naturally alongside Trang-Oul's Wing in the one-handed version. This slot is difficult to replace unless a very specific breakpoint or corruption requires it.
For the Belt, Trang-Oul's Girth fits perfectly into the Death's Web version and helps complete the Trang package while adding useful Mana and defensive stats. The high-FCR Staff setup can instead use Siggard's Staunch, especially with a Faster Cast Rate corruption, allowing more freedom in the remaining slots.
Silkweave is an excellent Boots choice because Mana After Each Kill directly supports constant Poison Nova casting and Blood Warp movement. Strong Rare Boots with Faster Run/Walk, Faster Hit Recovery, Resistances, and Life After Each Kill are the main alternative and can solve several defensive requirements at once.
A strong Rare or Crafted Necromancer Amulet with +2 Skills and Faster Cast Rate is generally the best endgame option. Additional Mana, Energy, Resistances, and Attributes are all useful, while FCR becomes especially important when assembling the 125% Skull Collector setup.
For Rings, Stone of Jordan is exceptional in the Death's Web version because +Skills and Maximum Mana scale both Damage and the Build's Energy-based defensive package. The faster Staff setup can use Constricting Ring for additional FCR, while Wisp Projector provides another useful high-end option once your breakpoint is already secured. Strong Rare or Crafted FCR Rings remain valuable whenever the final gear layout is just short of 75% or 125% FCR.
Charms
For the Poison Nova Necromancer, Infectious Large Charms with +3% Poison Skill Damage are the main offensive choice and should fill most of the inventory in a high-end setup. Unlike generic Skillers, these Charms directly multiply Poison Nova's Damage and become especially powerful when stacked across nearly every available slot.
A Necromancer Hellfire Torch and Annihilus should still form the foundation of the inventory, while the remaining space is best filled with Infectious Large Charms. The ideal secondary modifiers are Life or Faster Hit Recovery, allowing the Build to increase Damage without giving up important defensive breakpoints.
Use any leftover Small Charm space for Resistances, Life, Mana, or FHR as needed. Once those basic requirements are covered, maximizing the number of +3% Poison Skill Damage Large Charms becomes one of the most efficient ways to push the Build's endgame Damage further.
Mercenary
An Act 3 Lightning Mercenary with Static Field is an excellent endgame partner for the Poison Nova Necromancer. His main role is not to increase Poison Damage directly, but to weaken and control entire packs while you Blood Warp into them. Static Field quickly reduces enemy Life, while Exile provides Defiance and additional defensive support. Innocence adds Blade Shield, which repeatedly triggers on-striking effects and helps the Mercenary apply his utility much more consistently. This exact style of Act 3 Mercenary has been used successfully with Poison Nova and other aggressive telestomp Builds.
- Skyfall or Doom (Weapon)
- Exile (Shield)
- Flickering Flame or Griffon's Eye (Helmet)
- Innocence (Armour)
- Dracul's Grasp or Occultist (Gloves)
- Arachnid Mesh or Siggard's Staunch (Belt)
- Marrowwalk or strong Rare Boots (Boots)
Final Thoughts
The Poison Nova Necromancer is built around momentum: Blood Warp into position, release a Nova, curse tougher enemies when needed, and immediately move toward the next pack while Poison finishes the job. High Poison scaling, strong mobility, and a flexible defensive package make the Build exceptionally effective for players who prefer constant movement over stationary casting.
Its endgame variants also leave plenty of room for optimization, from heavy Energy investment and fast Blood Warp setups to aggressive facet stacking and specialized Mercenary support. Once the Damage and mobility come together, Poison Nova becomes one of the most fluid speed-farming Necromancer Builds in Project Diablo 2.
We will continue updating this guide with future Project Diablo 2 changes and expand our PD2 content with more builds and strategies.
If you have suggestions or would like to see other builds covered, feel free to share your feedback - it helps us improve and deliver better guides.
Images used in this article are the intellectual property of Blizzard Entertainment or its corresponding owners.