 Buy/Sell
 Log in


Static Strike of Gathering Lightning Juggernaut Build
Turn Strength into pure destruction with Static Strike of Gathering Lightning.Static Strike of Gathering Lightning
Juggernaut Build
Updated for Patch 3.29
The Best Crafty Guides by Odealo
| Guide notes |
| August 4, 2026 -Updated for patch 3.29 |
| Build overview | |||
| Tags: [MELEE] [CHAOS] [LIFE] | |||
|
Budget: Defenses: |
|
Boss DPS: AoE: |
|


Static Strike of Gathering Lightning is an exceptionally powerful Strike Skill that combines melee attacks with massive Lightning pulses, making it excellent for both Mapping and Single-Target Damage. This version is built around Strength Stacking, using Replica Alberon's Warpath to convert your enormous Strength investment into huge amounts of Added Chaos Damage. The result is a powerful and highly scalable build with excellent Clear and devastating Damage.
Juggernaut is a perfect Ascendancy for this archetype, providing Accuracy and Attack Speed scaling through Undeniable while also offering some of the strongest defensive tools available. The build heavily invests into Strength, turning every additional point of the Attribute into more Damage while simultaneously improving Accuracy, Attack Speed, and overall survivability. Static Strike of Gathering Lightning further enhances the setup with powerful built-in Lightning pulses and excellent Area Coverage.
Defensively, the build combines Juggernaut's natural durability with a large Life pool, Armour, and multiple layers of Damage Mitigation. The high Strength investment further improves the build's overall scaling, while the ability to attack and quickly move between packs keeps the gameplay fast and engaging. Once fully geared, Strength Stacking Static Strike of Gathering Lightning Juggernaut offers an excellent combination of massive Damage, powerful Clear, and exceptional Endgame durability.
You can also check our other Path of Exile builds right over here Odealo's Crafty Guides - Full List
1. Gameplay
Static Strike of Gathering Lightning provides excellent Clear by releasing powerful Lightning pulses after each Attack, allowing you to quickly move between packs while the pulses handle nearby enemies. Use your Movement Skill to stay mobile and maintain a fast Mapping pace. Against Bosses, focus on staying in place and attacking consistently to maximise your Damage output.
|
|
|
|


2. Build's PROS & CONS
| PROS |
|
| CONS |
|
3. Leveling tips
This is an Endgame-focused build, so we recommend leveling with a different setup throughout the Campaign. Choose a strong leveling build that can comfortably carry you through the early game, then continue progressing until you have the required Gear and enough Strength to make the transition worthwhile. For this purpose we recommend Earthshatter.
Once you reach around Level 90 and have assembled the core Unique Items and high-Strength Rare Gear, you can Respec your Passive Tree and transition into Static Strike of Gathering Lightning. From there, continue upgrading your Strength, Damage, and defensive layers to unlock the build's full Endgame potential.
Bandits:
We recommend killing all the Bandits for the extra Passive Point.
4. Final Skill Tree, Ascendancy Points, and Pantheon
Final Skill Tree:
119 Points Path of Building (PoB) link
Ascendancy points:
Preferably in that order:
- Undeniable
- Unstoppable
- Unflinching
- Unbreakable
Pantheon:
Major God: Soul of the Arakaali: 10% reduced Damage taken from Damage Over Time
Minor God: Soul of Abberath: 60% less Duration of Ignite on You, Unaffected by Burning Grounds
5. Final Gems links
| [DPS] Static Strike setup | |
 |
Static Strike of Gathering Lightning - the main Attack Skill, combining powerful Melee Hits with Lightning pulses that automatically strike nearby enemies for excellent Clear and strong Single-Target Damage. |
 |
Multistrike - repeats your Attacks multiple times, greatly increasing Attack Speed and overall Damage while helping you build Lightning pulses faster. Upgrade to Greater Multistrike later. |
 |
Fortify - provides a valuable defensive layer by granting Damage Reduction after hitting enemies with Melee Attacks. |
 |
Ancestral Call - allows your Attacks to target additional nearby enemies, significantly improving Static Strike's Clear Speed. Upgrade to Greater Ancestral Call later. |
 |
Volatility - provides a powerful More Damage multiplier while introducing a Damage range, making it highly effective for scaling our large Added Chaos Damage. |
 |
Void Manipulation - significantly increases Chaos Damage, making it an excellent Support for scaling the Added Chaos Damage from Replica Alberon's Warpath. |
| [UTILITY] Immortal Call and Withering Step setup | |
 |
Immortal's Call - provides a temporary layer of Damage Reduction against incoming Hits, helping the build survive sudden bursts of Damage. |
 |
Withering Step - applies Wither to nearby enemies, increasing the Chaos Damage they take. Cast it on bosses. |
 |
More Duration - increases the Duration of Immortal Call and Withering Step, improving the uptime of both their defensive and offensive benefits. |
| [UTILITY] CWDT setup | |
 |
Punishment - applies a powerful Curse that increases the Damage dealt to low-health enemies, helping us finish off tougher enemies and Bosses more quickly. |
 |
Summon Chaos Golem - provides a useful defensive buff and is sometimes resummoned by Cast when Damage Taken so we don't have to do it manually. |
 |
Cast when Damage Taken - automatically triggers linked spells after receiving enough Damage. |
| [MOBILITY] Leap Slam setup | |
 |
Leap Slam - provides fast and reliable mobility, allowing you to quickly move between packs. |
 |
Lifetap - removes Mana costs from Leap Slam by spending Life instead, making the Skill easier to use consistently. |
 |
Faster Attacks - increases Leap Slam's Attack Speed, making movement faster and more responsive. |
 |
Momentum - additionally speeds up Leap Slam. |
| [MOBILITY] Frostblink setup | |
 |
Frostblink - provides instant mobility, allowing you to quickly move between packs. Nice addition to Leap Slam. |
| [UTILITY] Precision setup | |
 |
Precision - provides additional Accuracy and Critical Strike Chance, helping us reliably hit enemies and improve our Damage. |
 |
Arrogance - allows Precision to reserve Life instead of Mana, making it easier to fit the Aura alongside our other Mana-reserving Skills. |
| [UTILITY] Blood Rage setup | |
 |
Blood Rage - grants increased Attack Speed and generates Frenzy Charges on Kill, providing a useful boost to our Damage and overall Attack Speed while Mapping. |
| [UTILITY] Mana-reserving setup | |
 |
Arctic Armour - provides additional protection against incoming Physical and Fire Damage while stationary, helping reduce Damage during Attacks and dangerous encounters. |
 |
Flesh and Stone - provides additional defensive utility by reducing the Damage you take from nearby enemies while in Sand Stance. |
 |
Enlighten - reduces the Mana Reservation of linked Auras. |
 |
Purity of Fire - grants additional Fire Resistance and raises the Maximum Fire Resistance, improving our defenses against Fire Damage. |
|
|
5. Gear Setup
This build's power comes from stacking Strength to scale both its Damage and overall performance, making the right Gear essential. In this section, you'll find everything you need to know about the core Unique Items, high-Strength Rare Items, and the most important modifiers for optimising the build. While the core Unique Items provide the foundation of the build, your Rare Gear is equally important, as stacking large amounts of Strength is key to reaching the build's full potential.
|
Stat priorities on items:
|
 (Helmet) Crown of Eyes - its Arcane Might effect further improves our Attacks, making it a strong offensive and defensive choice for the build thanks to Iron Will keystone. (Helmet) Crown of Eyes - its Arcane Might effect further improves our Attacks, making it a strong offensive and defensive choice for the build thanks to Iron Will keystone. |
|
| +(300—350) to Accuracy Rating (120—150)% increased Energy Shield -30% to Fire Resistance (0.4—0.8)% of Attack Damage Leeched as Life (0.2—0.4)% of Attack Damage Leeched as Mana Attacks have 150% Arcane Might |
|
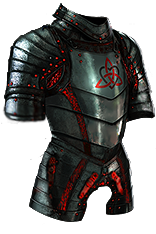 (Body Armour) The iron Fortress - a core defensive Unique that scales our Block Chance with Strength while also converting our Strength-based Damage bonus into powerful Melee Physical Damage. The additional Strength and Armour further improve both our Damage and survivability. (Body Armour) The iron Fortress - a core defensive Unique that scales our Block Chance with Strength while also converting our Strength-based Damage bonus into powerful Melee Physical Damage. The additional Strength and Armour further improve both our Damage and survivability. |
|
| +1% Chance to Block Attack Damage per 50 Strength Chance to Block Spell Damage is Unlucky +(60—120) to Strength (80—100)% increased Armour 10% reduced Movement Speed Strength's Damage Bonus instead grants 3% increased Melee Physical Damage per 10 Strength |
|
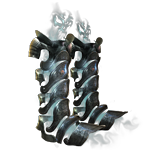 (Boots) Replica Alberon's Warpath - the defining Unique of the build, converting our massive Strength investment into huge amounts of Added Chaos Damage. It also provides increased Strength, Movement Speed, and Chaos Resistance, making it essential for the Strength-stacking setup. (Boots) Replica Alberon's Warpath - the defining Unique of the build, converting our massive Strength investment into huge amounts of Added Chaos Damage. It also provides increased Strength, Movement Speed, and Chaos Resistance, making it essential for the Strength-stacking setup. |
|
| (15—18)% increased Strength +(180—220) to Armour +(13—19)% to Chaos Resistance 25% increased Movement Speed Cannot deal non-Chaos Damage Adds 1 to 80 Chaos Damage to Attacks per 80 Strength |
|
 (Belt) Foulborn Meginord's Girdle - provides a large amount of Strength with increased Strength and Maximum Life modifiers - making it a strong choice for our Strength-stacking setup. (Belt) Foulborn Meginord's Girdle - provides a large amount of Strength with increased Strength and Maximum Life modifiers - making it a strong choice for our Strength-stacking setup. |
|
| +25 to Strength Adds 10 to 20 Physical Damage to Attacks 10% increased maximum Life +(10—20)% to Cold Resistance (5—15)% increased Strength |
|
 (Weapon) Rare Sword - a powerful offensive slot providing increased Attack Speed, Chaos Resistance Penetration, and a More Attack Damage multiplier for Socketed Skills. Strength is highly valuable for further scaling our Damage, while the Double Damage while Focused modifier is a strong optional upgrade. It is both Elder and Shaper influenced item. (Weapon) Rare Sword - a powerful offensive slot providing increased Attack Speed, Chaos Resistance Penetration, and a More Attack Damage multiplier for Socketed Skills. Strength is highly valuable for further scaling our Damage, while the Double Damage while Focused modifier is a strong optional upgrade. It is both Elder and Shaper influenced item. |
|
| Min. requirements: Socketed Gems are Supported by Level 10 Endurance Charge on Melee Stun Socketed Skills deal 20% more Attack Damage Attacks with this Weapon Penetrate (14-16)% Chaos Resistance 20% increased Attack Speed Optional affixes: Strength #% chance to deal Double Damage while Focused |
|
 (Gloves) Rare Gloves - provide valuable Strength, Attack Speed, and Life while scaling our Damage through the Strength modifier. Get both implicits as they are very important for this build. (Gloves) Rare Gloves - provide valuable Strength, Attack Speed, and Life while scaling our Damage through the Strength modifier. Get both implicits as they are very important for this build. |
|
| Min. requirements: 50+ Strength 10% increased Attack Speed 100 Maximum Life 3% increased Damage per 100 Strength Non-Vaal Strike Skills target 1 additional nearby Enemy Optional affixes: 80% Total Elemental Resistances Armour Chaos Resistance |
|
 (Amulet) Astramentis - big source of all Attributes and a cheap option for Amulet slot. (Amulet) Astramentis - big source of all Attributes and a cheap option for Amulet slot. |
|
| +(80—100) to all Attributes -4 Physical Damage taken from Attack Hits |
|
| Recommended Anointments: Sione's Ambition Force of Darkness |
|
 (Amulet) Simplex Amulet - best in slot Endgame option. Can be ridiculously expensive but rewards it with making your build few times stronger. (Amulet) Simplex Amulet - best in slot Endgame option. Can be ridiculously expensive but rewards it with making your build few times stronger. |
|
|
Recommended affixes: |
|
| Recommended Anointments: Sione's Ambition Force of Darkness |
|
 (Ring) Rare Ring - big slot for Strength stacking as we can apply Attribute Catalyst which further increases Attributes gained from this slot. (Ring) Rare Ring - big slot for Strength stacking as we can apply Attribute Catalyst which further increases Attributes gained from this slot. |
|
| Min. requirements: 50+ Strength 15+ to All Attributes 100% Total Elemental Resistances 80 Maximum Life Non-Channeling Skills have -7 to total Mana Cost. Optional affixes: Intelligence |
|
 (Jewel) Large Cluster Jewel - get 8 Passives with increased Damage with Two Handed Weapons and 3 Passive Skills that benefit the build. (Jewel) Large Cluster Jewel - get 8 Passives with increased Damage with Two Handed Weapons and 3 Passive Skills that benefit the build. |
|
| Recommended affixes: 1 Added Passive Skill is Graceful Execution 1 Added Passive Skill is Martial Mastery 1 Added Passive Skill is Martial Prowess |
|
 (Jewel) Rare Jewels - we need a lot of jewels in this build, since we use 3 clusters. (Jewel) Rare Jewels - we need a lot of jewels in this build, since we use 3 clusters. |
|
| Recommended affixes: % increased Maximum Life # to All Attributes # to Strength % increased Damage with Swords % increased Attack Speed Elemental Resistances |
|
 (Jewel) Lethal Pride - search for jewels which gives as Increased Strength or any other useful modifiers on notable passive skills (Jewel) Lethal Pride - search for jewels which gives as Increased Strength or any other useful modifiers on notable passive skills |
|
| Commanded leadership over (10000—18000) warriors under Kaom Passives in radius are Conquered by the Karui Historic |
|
 (Jewel) Split Personality - provides additional Strength and Maximum Life, with its effect scaling based on the distance between the Jewel and our starting location. It is an excellent choice for further improving our Strength stacking and overall Damage. (Jewel) Split Personality - provides additional Strength and Maximum Life, with its effect scaling based on the distance between the Jewel and our starting location. It is an excellent choice for further improving our Strength stacking and overall Damage. |
|
| This Jewel's Socket has 25% increased effect per Allocated Passive Skill between it and your Class' starting location +5 to Strength +5 to maximum Life |
|
 (Flask) Sin's Rebirth - grants Unholy Might during its Effect, providing a strong boost to our Chaos Damage. (Flask) Sin's Rebirth - grants Unholy Might during its Effect, providing a strong boost to our Chaos Damage. |
|
| Grants Immunity to Ignite for 4 seconds if used while Ignited Removes all Burning when used Unholy Might during Effect |
|
|
Other suggested Flasks:
|
|
    |
|
|
If you have any other build requests please leave them in the comments below. We are always open to suggestions and constructive feedback.
Pictures used in this article are the intellectual property of Grinding Gear Games.
