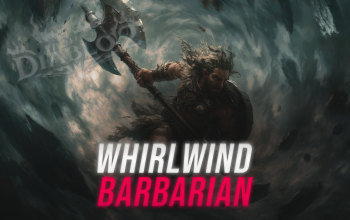
Whirlwind Barbarian Build for PD2
One of the most iconic spin-to-win builds in the genre is back!Whirlwind Barbarian 2H Build
Last Update: April 22, 2026
Introduction
Whirlwind Barbarian has always been one of the most iconic melee builds in Project Diablo 2, but in Season 13, it has received a series of impactful buffs and mechanical improvements that push it firmly into top-tier territory. Thanks to changes to Weapon Masteries and melee splash mechanics, the build now benefits from increased Critical Strike scaling and significantly improved area damage, making it far more efficient at both clearing and bossing than in previous seasons.
One of the most important quality-of-life upgrades is the ability to use potions during the Whirlwind animation. Previously, getting locked into a long spin could feel clunky or even dangerous in certain situations. Now, this limitation is gone, making the build much smoother and far less punishing to play, especially in high-density maps or challenging encounters.
The core gameplay revolves around continuously channeling Whirlwind through packs of enemies, dealing consistent AoE damage while maintaining mobility. Unlike many other melee builds, Whirlwind does not rely on traditional attack cycles - instead, it delivers damage in a fluid, uninterrupted motion, allowing you to reposition while attacking and maintain constant pressure on enemies.
As your gear improves, the build scales exceptionally well with weapon damage, Critical Strike, and enhanced physical modifiers. With proper investment, it becomes a powerful endgame farmer capable of shredding large packs and handling bosses efficiently, all while maintaining a straightforward and satisfying playstyle.
Breakpoints (Quick Overview)
Whirlwind functions differently from most skills, which makes traditional breakpoints far less relevant:
- Faster Cast Rate (FCR): Not needed
- Increased Attack Speed (IAS): Does not meaningfully affect Whirlwind
- Faster Hit Recovery (FHR): Useful, but typically covered by endgame gear
Since you spend most of your time locked in the Whirlwind animation, attack speed and cast speed provide little to no benefit. The only stat worth paying attention to is FHR, which helps prevent getting stunned or killed in the short windows between spins - but in practice, you will naturally obtain enough from gear.
Stat Allocation (Baseline Setup)
- Strength: Split with Vitality (for damage scaling and gear requirements)
- Dexterity: Enough for gear and Attack Rating
- Vitality: Remaining points (roughly equal priority with Strength)
- Energy: Base
This setup balances damage and survivability, as Strength directly improves your melee output, while Vitality ensures you can comfortably survive endgame content.
Pros
- Extremely smooth and satisfying gameplay loop
- Massive AoE damage with improved melee splash
- Strong scaling with gear investment
- Much safer than before
- High mobility while dealing damage
Cons
- Gear-dependent to reach full potential
- Can feel weaker early before upgrades
You can also visit this page to check our other Project Diablo 2 Builds
Skill Trees
The Whirlwind Barbarian in Project Diablo 2 uses a very streamlined skill setup that focuses almost entirely on maximizing core damage and utility. Unlike many other builds, Whirlwind has no direct synergies, which means there is no reason to invest in lower-tier active skills for scaling purposes.
Because of this, your points are distributed across all three trees - Combat Skills, Combat Masteries, and Warcries - focusing on passives and key utility abilities. This is also why this setup should NOT be followed while leveling, as early progression benefits much more from temporary skills with better base damage.
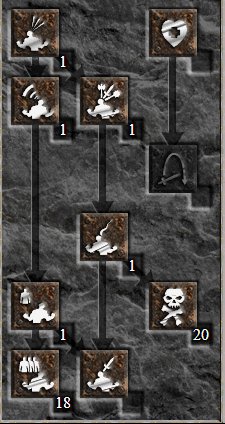
Combat Skills
This tree is very straightforward:
- Whirlwind - Max
- 1 point in all prerequisites
Whirlwind is your main and only active damage skill. Since it has no synergies, you simply max it as soon as possible and avoid investing in anything else beyond prerequisites.
Combat Masteries
This tree provides the bulk of your scaling:
- Weapon Mastery - Max (Two-Handed or One-Handed, depending on your setup)
- Deep Wounds - Max
- Natural Resistance - 1 point
Your chosen Weapon Mastery significantly boosts your damage through Enhanced Damage, Attack Rating, and Critical Strike - especially valuable after Season 13 buffs.
Deep Wounds is extremely important, not only for its own damage contribution but also because it synergizes with Grim Ward, further amplifying your overall effectiveness.
A single point in Natural Resistance is enough, as +skills from gear will handle the rest.
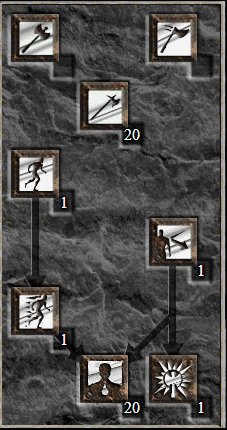
Warcries
This tree adds utility, survivability, and damage amplification:
- Grim Ward - Max
- Battle Orders - Remaining points (late game / high level)
- 1 point in all prerequisites
Grim Ward is a key part of the build, greatly enhancing your damage output while also providing utility in combat. With the synergy from Deep Wounds, it becomes even more impactful in endgame scenarios.
Battle Orders is your go-to dump for leftover points as you approach higher levels (especially near level 99), significantly boosting your Life and survivability.
All other Warcries only require a single point to unlock the tree and provide basic utility.
Gear
This build revolves around maximizing raw physical damage through your weapon, which is why your weapon choice is by far the most important part of the setup. Two-handed weapons are generally preferred, as they offer superior scaling and simplicity compared to dual-wield or one-handed alternatives. Top-tier options like Steel Pillar and The Reaper’s Toll provide exceptional damage and utility, while classics such as The Grandfather remain very strong and popular choices. Due to the sheer number of viable options and the overall advantage of two-handed setups, we do not focus on one-handed variants here.
Once your weapon is established, the rest of your gear focuses on amplifying physical damage while maintaining survivability. The most important stats are Enhanced Damage, Deadly Strike, Crushing Blow, and Attack Rating, alongside Life and Resistances. Since Whirlwind does not benefit from attack speed or cast speed in a meaningful way, you can fully prioritize raw damage and defensive stats without worrying about traditional breakpoints.
For the Helmet slot, Demonhorn’s Edge and Halaberd’s Reign are among the best Barbarian-specific options, offering a strong mix of offensive and defensive bonuses. Guillaume’s Face is also a very competitive alternative, especially if you want to stack more Crushing Blow and Deadly Strike for faster boss kills.
Body Armor offers several strong paths depending on your budget. Fortitude is the premier choice due to its massive Enhanced Damage bonus, making it the best option for maximizing overall DPS. Toothrow is another strong offensive armor, while Wraithskin can also be used as a solid alternative depending on your setup and needs.
Boots are very straightforward, with Gore Rider being the top choice thanks to its perfect combination of Crushing Blow, Deadly Strike, and Open Wounds, all of which scale extremely well with Whirlwind.
Gloves provide a mix of offense and sustain. Steelrend is the go-to option for maximizing raw damage, while Dracul’s Grasp offers excellent survivability through Life Tap. Soul Drainer sits somewhere in between, offering a balanced combination of utility and damage.
For belts, String of Ears and Verdungo’s Hearty Cord are the best options, both providing valuable damage reduction and survivability, which is crucial for a melee build constantly engaging enemies in close range.
Jewelry offers some flexibility depending on your needs. Atma’s Scarab is one of the strongest amulets due to its ability to amplify physical damage, while Highlord’s Wrath is another excellent option focused on offensive scaling. For rings, Raven Frost is essentially mandatory due to Cannot Be Frozen and Attack Rating, while Wisp Projector and Bul-Kathos’ Wedding Band are both strong secondary options, offering utility, damage, and survivability.
For players on a lower budget, the Immortal King set is an excellent starting point. It is typically easy to acquire early in the season and provides a very solid, well-rounded setup that can comfortably handle mid-tier content and mapping before transitioning into more optimized endgame gear.
Additionally, you should dual-wield Call to Arms on your weapon swap to use higher-level Warcries when pre-buffing yourself. Alternatively, you can try getting two random Magic/Rare Weapons with +3 to Warcries and use them instead; it's a cheaper option.
Charms
For Charms, the setup is quite straightforward, but offers a bit more flexibility compared to typical caster builds due to the way Whirlwind scales.
You should always use Hellfire Torch and Annihilus, as they provide +Skills, Attributes, and Resistances—all highly valuable for this build.
For Grand Charms, the most common and generally recommended option is to stack +Combat Skills, as this directly improves your Whirlwind damage and overall efficiency. That said, with the Season 13 changes, there is still unexplored potential in Combat Masteries skillers. It is not yet clearly determined whether they can outperform Combat Skills in fully optimized setups, so this remains an area worth testing.
For Small Charms, focus primarily on Life and All Resistances to improve survivability in higher-tier content. You can also include Magic Find if you want to optimize your farming efficiency, as well as minor utility stats depending on your needs.
Overall, Charm choices are simple and effective, with the main decision revolving around whether to fully commit to Combat Skills or experiment with Combat Masteries scaling.
Mercenary
For the Whirlwind Barbarian in Project Diablo 2, your Mercenary plays an important supporting role, mainly by providing additional auras, utility, and survivability.
The top recommendation is the Act 5 Might Mercenary, which synergizes perfectly with your physical damage scaling. The Might aura provides a direct boost to your DPS, making it the most consistent and effective choice overall. One of the biggest advantages of this option is how easy it is to gear—a full Immortal King set works extremely well here and is often something you already have from earlier progression. It offers a balanced mix of damage, survivability, and utility without requiring expensive items.
For a more optimized setup, you can upgrade your Mercenary’s gear with items like String of Ears and Dracul’s Grasp for survivability, alongside a weapon such as Gavel of Pain, which provides Amplify Damage procs. This significantly increases your overall damage output by reducing enemy physical resistance, making it especially valuable in tougher content.
An alternative and also very strong option is the Act 1 Vigor Mercenary, which focuses more on utility and speed. The Vigor aura greatly improves your mobility, making map traversal smoother and more efficient. This Mercenary is typically equipped with Faith to grant the Fanaticism aura, further boosting your damage and attack-related stats, and Templar’s Might for an additional Might aura. Standard survivability gear such as Vampire Gaze, Dracul’s Grasp, String of Ears, or Marrowwalk rounds out the setup.
Overall, the Act 5 Mercenary is the best all-around choice for maximizing raw power and simplicity, while the Act 1 variant offers a more utility-focused approach with increased speed and aura stacking.
Final Thoughts
Whirlwind Barbarian is one of the most satisfying and well-rounded melee builds in Project Diablo 2, especially after the Season 13 improvements. With its smooth gameplay, strong scaling, and newfound quality-of-life changes, it offers an efficient and reliable setup for both mapping and bossing.
We will continue updating this guide with future PD2 patches and expanding our content with more builds and strategies.
If you have any suggestions or would like to see other builds covered, feel free to share your feedback—it helps us improve and deliver better guides.
Images used in this article are the intellectual property of Blizzard Entertainment or its corresponding owners.